


RISC OS 3.7 User Guide
18 Edit 
Edit is a text editor which you can use to create and edit plain text, and to generate simple text documents and command scripts.
Edit is also a BASIC program editor. It converts BASIC programs into text format for editing, and then converts them back again when they are saved.
Although Edit does have some sophisticated features for handling text, it has not been designed as a word processor; word processors offer facilities for pagination and page layout control as well as paragraph styles and printable fonts.
Starting Edit
 Edit is in the Apps icon bar directory display. To start Edit, double-click on the !Edit application icon. The application icon appears on the icon bar.
Displaying an Edit file
To display an existing text file, just double-click on it, or drag the file's icon to the Edit icon on the bar.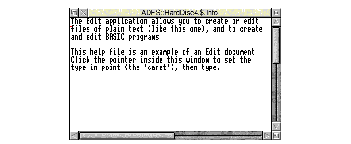
Displaying other file types
To display any other file type, drag the file icon to the Edit icon on the bar, or hold down Shift and double-click on it. BASIC files are displayed as text.
Opening a new text document
Click on the Edit icon on the icon bar to open a new document. 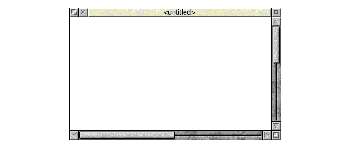
Creating other file types
You can open new windows for other specific types of file: Text, BASIC, Obey and Command files. To do this, choose Create from the Edit icon bar menu and specify the file type you want. Alternatively you can type in a file type of your own choice at the bottom of the Create menu.
Typing in text
When you first open a new Edit window, a red I-shaped bar - the caret - appears at the top left of the window. This is where text appears when you start typing. You can open more than one Edit window (see Other features of Edit on page 278) but only one (the current window) has the caret in it. This window is said to have the input focus, and is also identified by its cream rather than grey title bar. You can only type in the window which has the input focus.
If you type in some text without pressing Return at all, the window scrolls sideways (if your Edit window is smaller than your screen). You can break your text into lines by pressing Return. Alternatively, click on the Toggle size icon to extend the window to the full size and avoid having to scroll sideways.
As you type, notice that Edit fills the current line and then carries on to the next line, often breaking words in the middle. By default, it doesn't automatically enter formatting characters such as newline, as these might create problems in scripts and programs, and in transferring text into other editors. Formatting text on page 273 tells you how to set wordwrap and other formatting options if you want them.
Editing text
Here are some basic techniques for entering and deleting text:
To:
- Insert new text in an Edit window: Click Select to position the caret. You can now insert text by typing.
- Overwrite existing text: Press Menu and choose Misc/Overwrite. Normally, when you type, new characters are inserted at the caret.
- Delete characters to the left of the caret: Position the caret after the character and press Backspace or Delete. Hold the key down to delete more characters.
- Delete characters to the right of the caret: Position the caret before the character and press the End key. Hold the key down to delete more characters.
There are quicker ways of deleting a lot of text - see page 264.
Selecting text
You can edit more than one character at a time by defining a block of text you want to edit, then cutting, copying or pasting the whole block. A block of text can be one or two characters, a word, a line, a paragraph or the whole document:
To:
- Select a word: Double-click on the word.
- Select a line: Triple-click on the line.
- Select an area of text: Click Select at the start, then Adjust at the end of the block. Another way is to drag Select across the block.
- Extend a selected block: Click Adjust at the new start or end.
- Cancel a selection: Choose Select/ Clear. You can also press Ctrl-Z.
Block editing operations
First select a block of text as described in the previous section
To:
- Delete a selection: Choose Select/Delete. You can also press Ctrl-X.
- Copy a selection: Place the caret where you want the selection to be copied to, then choose Select/Copy. You can also press Ctrl-C.
- Move a selection: Place the caret where you want the selection to appear and choose Select/Move. You can also press Ctrl-V.
Undoing changes
If you make a mistake or have second thoughts about an edit, choose Edit/ Undo (or press F8) to step back through your most recent changes. The number of changes you can reverse in this way varies according to the operations involved.
Edit/Redo (or the F9 key) allows you to remake the changes you reversed with Undo.
Finding and replacing text
Edit has a very sophisticated find and replace function, to enable you to find words or characters in a document and replace them by others if you wish.
To find a particular word or character (the 'target string') position the caret at the start of the file before choosing Find. The target string may be any combination of words, numbers, letters, spaces or other non-printing characters.
Searching for a string
- 1 Choose Edit/Find:

- 2 Type in the string you wish to find and click on Go.
(If you've already tried to find the string once and want to search for it again, click on Previous.)
If the string is not located, the message Not found is displayed.
If it is found, the Text found dialogue box appears:

- 3 Click on Continue to look for the next instance of the string.
Other Find and Replace options
To:
Making searches case sensitive
By default, Find text makes no distinction between upper and lower case: it will find for example HELLO, hello, or HeLLo. If you click on Case sensitive, however, it will find only those instances which match exactly in case.
Using magic characters
You can also use find and replace special, or 'magic' characters. Click on Magic characters (or press F5) in the Find dialogue box and a list of them will be displayed in the lower half of the dialogue box: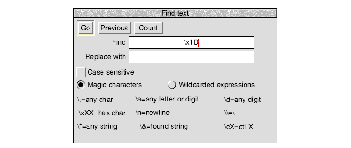
Magic characters start with a \ character, and you type them into the Find and Replace with boxes exactly as shown:
Functions and their magic characters:
- Match any string (including a string consisting of no characters at all): \* . This is most useful in the middle of a search string. For example, jo\*n matches jon, john, and johaan.
- Match any single alphabetic or numeric character: \a . So t\ap matches tip, tap, and top, but not trap.
- Match any digit (0 to 9): \d
- Match any character at all, including spaces and non-alphabetic characters: \.
- Match the newline character : \n . To the computer, this is a character just like any other (Hex &0A).
- Match Ctrl-X, where X is any character: \cX . Matches control codes, where X is in Hex.
- Represent the found string in the Replace with box: \& . This is particularly useful when you've used magic characters in the Find string. For example, if you've searched for t\ap, and you want to add an s to the end of all the strings found, \&s in the Replace with box will replace tip, tap and top by tips, taps and tops.
- Search for a string actually containing the backslash character \ while using magic characters: \\ . To search for the strings cat\a or cot\a, enter
c\at\\a.
- Match characters by their ASCII number, expressed in hexadecimal: \xXX: Thus \x61 matches lower-case a. This is principally useful for finding characters that are not in the normal printable range.
Using wildcarded expressions
There is also a facility for specifying wildcarded expressions in search strings. Click on Wildcarded expressions in the Find dialogue box to display the ones you can use: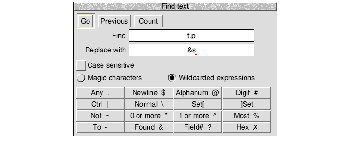
Click on the wildcard character you wish to enter and it is copied into the text box at the caret.
Functions and the wildcard symbol to click on:
- Match any single character:

- Match linefeeds:

- Match any alphanumeric character (A to Z, a to z, 0 to 9, and _):

- Match 0 to 9:

- Match any control character:
 For example, to search for Ctrl-Z, type in
 |z.
- Match any character following it even if it is a special character:

# would be searched for as \#.
- Match any one of the characters between the brackets:
 : This is always case sensitive.
- Match any character (in the ASCII character set) between two given characters (e.g. a - z):

- Not match character:

~C matches any character apart from C. This can also be applied to sets.
- Match zero or more occurrences of a character or a set of characters:

T*O matches T, TO,TOO, TOOO etc.
- Match one or more occurrences of a character or a set of characters:

T^O matches TO, TOO, TOOO etc.
% is the same as ^, except when used as the final element of a search string:  In this case the longest sequence of matching characters is found.
- Match the found string:
 This is useful with wildcard characters in the Find string. For example, if you've searched for
 t.p, and want to add an s to the end of all the strings found, &s in the Replace with string will replace tip, tap and top by tips, taps and tops.
- Match the nth ambiguous part of the search pattern, where n is a digit from 0 to 9:
 Ambiguous parts are those which could not be exactly specified in the search string; e.g. in the search string
 %#fred*$ there are two ambiguous parts, %# and *$ - which are ?0 and ?1 respectively. Ambiguous parts are numbered from left to right. (Only to be used in the Replace with string).
- Match the character whose ASCII number is nn, where nn is a two-digit hex number:
 X (Hex button)
61 matches lower-case a. This is principally useful for finding characters that are not in the normal printable range.
The full power of the wildcard facility can be illustrated by a few examples:
- To count how many lower case letters appear in a piece of text:
Find:
[a-z]
and click on Count.
- To count how many words are in a piece of text:
Find:
%@
and click on Count.
- To surround all words in a piece of text by brackets:
Find:
%@
Replace with: (&)
and click on Go, then on End of File Replace in the Found dialogue box.
- To change all occurrences of strings like #include "h.foo" into #include "foo.h":
Find:
\#include "h\.%@"
Replace with: #include "?0.h"
and click on Go, then on End of File Replace in the Found dialogue box.
- To remove all ASCII characters, other than those between space and ~, and the newline character, from a file:
Find:
~[ -\~$]
Replace with: (nothing)
and click on Go, then on End of File Replace in the Found dialogue box (i.e. find all characters outside the set from the space character to the ~ character, and newline, and replace them with nothing). In fact this could be written without the \, since ~ would not make sense in this context if it had its special meaning of Not:
Find: ~[ -~$]
Reading in text from another file
 If you want to add all the text from another file into the current file:
- 1 Position the caret at the point where the inserted text is to appear.
- 2 Open the directory display for the source file, and drag its icon into the destination text window.
The entire contents of the source file is then copied into the destination file, starting at the caret position. The caret appears at the end of the text you have inserted.
There are two ways of reading in part of one file into another:
- Highlight the text you want to save out, move the pointer over the destination document and click to position the caret. Then choose Edit/Copy, or press Ctrl-C.
- Position the caret in the destination file. Highlight the text you want to save out from the source file, then drag the Edit/Save selection/Save as icon into the destination file.
Formatting text
Formatting describes how the text in Edit is arranged on the page.
Before you can use these features, click in the Edit window to get the input focus (the title bar will turn yellow).
To:
- Set a margin: Choose Display/Margin. Type in a value and press Return.
 You can have one lefthand margin set at a time in Edit. The margin is set in pixels.
- Set the line spacing: Choose Display/Line spacing. Type in a value and press Return.
 Line spacing is set in pixels, and can be a positive or negative value.
- Reformat all lines in a paragraph to a given length: Place the cursor anywhere in the paragraph, choose Edit/Format text, type in a value for width and press Return.: Useful for tidying up after editing. Width is measured in characters per line: this value is also used by the Wordwrap option.
- Make your text fit the size of the window: Choose Display/ Window wrap. Revert to default by choosing the option again.
- Prevent words being split over lines as you type: Choose Misc/ Wordwrap. A newline character is inserted at the end of a line and the next whole word is wrapped onto the next line. Line length is set in the Edit/Format text option.
- Convert linefeeds to carriage returns (and vice-versa): Choose Edit/CR<->LF. Choose again to undo. Carriage returns appear as
[0D] in the text.
Indenting text
You can indent a selected block of text in Edit. The indent is defined in character spaces. You can indent using just spaces, or add a text prefix to the beginning of each line of a block.
To indent a selected block of text, choose Edit/Select/Indent:
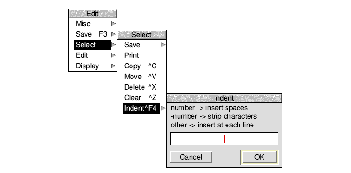
You can then type in one of three different types of indent:
- A positive number gives you an indent of the specified width.
- A negative number: -5, for example, deletes the specified number of spaces or characters from the beginning of the block line - use this to cancel an indent.
- You can also type in text:
IGNORE, or Note, for example. This will then appear at the beginning of every line in the selected block. You can remove this text by indenting with a suitable negative number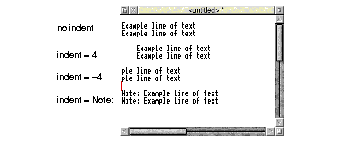
Using tabs
Tabs in Edit are designed to work with fixed-pitch fonts, such as the System font. If you use tabs in Edit with proportionally-spaced fonts (such as Trinity, for example), tables will not line up properly.
Laying out tables with irregular columns
Lay out the first line of a table (the headings, for example) using spaces between each column. On the next line, press Tab and the cursor will jump to each column in turn: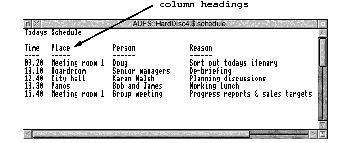
Laying out tables with regular columns
Pressing Tab with Misc/Column tabs switched on sets tabs every eight spaces.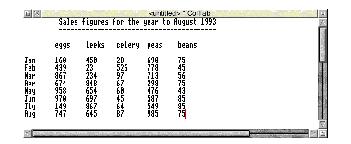
Converting tab characters to column tabs
You may have text imported from a word processor, which has tab characters ([09]) embedded in it. These can be expanded into Edit regular column tabs (eight spaces for each tab character) by choosing Edit/Expand tabs.
The text will be reformatted so that each tab character is replaced by eight spaces.
Changing the display font
You can display Edit files using any available desktop font:
To:
- Change the screen font displayed by Edit: Choose from the Display/Font submenus. Tabs and columns will not look right in proportional fonts.
- Change the screen font size: Choose the size in points from the Display/Font size menu. You can specify a different size in the bottom of the Font size menu.
- Change the screen font height: Choose Display/Font height then the size you want (in points). The current width will not be changed (use Display/Font size).
- Change the text colour: Choose a colour from the Display/Foreground submenu.
- Change the background colour: Choose a colour from the Display/Background submenu.
- Invert text and background colours: Choose Display/Invert. Choosing this option again toggles back.
Note: Font information is not saved with the Edit file, so does not print. You can only have one style of text at a time in each Edit document.
Exporting (saving) text
The Save menu allows you to save a complete file; you can also save part of a file.
To:
- Save a new file: Press Menu over the Edit file and drag the Save/Save as icon to the destination directory (changing the default name
TextFile if necessary). You can also press F3 to display the Save as box.
- Save a file that's already been saved: Press F3 followed by Return .
- Save part of a text file: Select the text you want to save. Press Menu, drag and drop the Selection/Save /Save as icon. You can use this method to export text to another Edit file, or another application (e.g. Draw - see page 250).
Printing Edit files
There are several ways of printing an Edit file; to use them, you first need to load the Printers application (refer to Printing your files on page 143).
To:
- Print an open Edit file: Choose Misc/Print. You can also press the Print key, or drag the Save/Save as icon onto the printer's icon bar icon.
- Print a selection: Choose Select/Print. You can also drag the Select/Save as icon onto the printer's icon bar icon.
- Print an Edit file not currently open: Drag the file's icon to the printer's icon bar icon. You can also do this if the file is loaded. Unsaved changes will not print.
Note: Edit files are always printed out using the printer's default font. This overrides any screen font (chosen from the Edit/Display/Font menu).
Other features of Edit
This section describes some features of Edit that you won't need to use very often.
To:
- Extend an Edit window so it's wider than the current screen mode: Enter the line length (in terms of System font characters) in the Display/Work area/Width box. System font size is used even you're using a different font. This is useful for viewing text files 80 or 132 characters wide in mode 12. Max. size is 192 System font characters. Not available when Window wrap is on.
- Send the caret to a specific line of text: Choose Edit/ Goto.
 'Line' means the string of characters between two presses of Return. If you have not formatted your text, a line in this sense may run over more than one display line.
- See information about Edit: Display the Misc/Info box. You can also choose Info from Edit's icon bar menu.
- See information about the current file: Display the Misc/File information box.
 This tells you the file type, whether it's been modified, the size in characters and creation (or modification) date.
- Change a file's type: Enter the new type in the Misc/ Set type box. See also Creating other file types on page 262.
- Open another window on the same file: Choose Misc/New view. Changes you make in one window will be reflected in any others.
Writing and editing BASIC programs
Edit allows you to write BASIC programs, converting the Text files produced in Edit to tokenised BASIC files. A tokenised file is one where BASIC keywords are replaced by seldom-used ASCII characters, to make the program smaller and faster in execution.
Writing a new program
To write a new program, choose Create/BASIC from Edit's icon bar menu. You can type your program directly into an Edit window. There is no need to include line numbers, as Edit will insert them for you when you save the file. Press Return at the end of the last line of the program.
Editing an existing program
To use Edit for working on an existing BASIC program, simply drag the program's icon from its directory onto the Edit icon on the icon bar, or Shift double-click on its icon.
Line numbers
By default, line numbers will be stripped when a BASIC file is loaded. To turn this option on or off, choose Strip line numbers from the Edit icon bar menu. If a reference to a line is found, an error box will appear.
Line numbers are added when a BASIC file is saved. Use Line number increment from the Edit icon bar menu to set the number increment between successive lines in the program.

Converting to a tokenised file
A tokenised file saves space: top-bit-set characters and control characters (non-printing characters) are used to stand for the BASIC keywords. So, for example, the Hex character E3 stands for the keyword FOR.
Converting a text file to a tokenised file is usually quite straightforward. If there are no line numbers, by default Edit will start at 10 and increment by 10. If line numbers are supplied, these are used as a basis for any lines without line numbers.
Warnings
If there are line numbers, Edit will not sort them into ascending sequence and the resulting BASIC program may behave strangely.
If your code is incomplete, Edit will warn you about the following problems:
- Line number reference too large.
- Mismatched quotes.
- Mismatched brackets.
In all cases Edit will also quote the offending line number. After you have clicked on OK, the tokenising continues.
Attempts to tokenise a crunched program (e.g. one with the spaces removed) will generally result in a non-functioning program.
Printing a BASIC program
If you have Edit running, you can print a BASIC program on paper by dragging its icon onto a printer driver icon. Edit will perform the conversion to allow the program to be printed.
Quitting Edit
Choose Quit from the Edit icon bar menu to stop Edit and remove it from the computer's memory. A dialogue box may be displayed, warning you if there are any current files you have not saved. 
Saving Edit features in a Desktop boot file
 You may wish to change some aspects of the way new Edit windows appear. For example, a new window normally opens using black text on a white background, but you may prefer to have blue text on a red background ready to use each time you start Edit.
You can set features of this type by setting up Edit just as you wish to use it, then save these features by creating a Desktop boot file. Instructions on how to create a Desktop boot file are given in Configuring applications on page 427.
Keystroke equivalents
On occasions, it can be quicker when you are working in Edit to use the keyboard instead of the mouse, especially once you are familiar with the program.
When editing
Actions and keys to press:
- Move caret one character left, right, up or down: cursor keys
- Move caret one word left or right: Shift left/right cursor keys
- Move caret one page up or down: Shift up/down cursor keys
- Move caret to start of file: Ctrl up cursor key
- Move caret to end of file: Ctrl down cursor key
- Move caret to start or end of line: Ctrl left/right cursor keys
- Scroll file without moving caret: Ctrl Shift up/down cursor keys
- Scroll all documents up by one line: Ctrl Shift right cursor key
- Scroll all documents down by one line: Ctrl Shift left cursor key
- Delete character to left of caret: Delete or Backspace
- Delete character to right of caret: End
- Delete word at current caret position: Shift-End
- Delete line at caret: Ctrl-End
- Place caret at top of document: Home
- Insert space to right of caret: Insert
- Scroll up or down one window: Page Up/Page Down
- Move caret up or down one line without scrolling: Shift-Page Up/Page Dn
- Move caret and scroll up or down one line: Ctrl-Page Up/Page Dn
- Toggle column tabs on or off: Shift-F3
- Toggle overwrite mode on or off: Shift-F1
- Toggle word wrap on or off: Ctrl-F5
- Make where the caret is the current selection and move the caret to where the selection was (i.e. toggle caret and selection): Ctrl-F7
In the Select menu
Actions and keys to press:
- Clear selection: Ctrl-Z
- Delete selection: Ctrl-X
- Copy selection to caret: Ctrl-C
- Move selection to caret: Ctrl-V
In the Edit menu
Actions and keys to press:
- Display Find dialogue box: F4
- Indent selected block: Ctrl-F4
- Display 'Goto' dialogue box: F5
- If no block is selected, select the single character after the caret. If a block is selected, and the caret is outside it, extend the selection up to the caret. If a block is selected and the caret is inside it, cut the block from the caret position to the nearest end of the block: F6
- Clear the current selection: Shift-F6
- Copy the selected block to the current caret position: F7
- Move the current selection to the caret position: Shift-F7
- Undo last action: F8
- Redo last action: F9
- Format text block : Ctrl-F6
- Toggle between CR and LF versions of the file: Ctrl-F8
- Expand tabs: Ctrl-Shift-F1
- Close the Edit window: Ctrl-F2
In the Find menu
Note: these keystroke definitions only come into play once the Find dialogue box has been displayed (e.g. by typing F4).
Actions and keys to press:
- Move caret between the find and replace text in the Find box: up/down cursor keys
- This starts the search and displays the Text found dialogue box if the text string is found: F1
- Use previous find and replace strings: F2
- Count occurrences of find string: F3
- Toggle case sensitive switch: F4
- Toggle magic characters switch: F5
- Toggle wildcard expressions switch: F6
File options
Actions and keys to press:
- Open a dialogue box enabling you to load an existing Edit file into a new window: F2
- Open a dialogue box enabling you to insert an existing Edit file at the caret position: Shift-F2
- Save the file in the current window (this is a shortcut to the normal Save as dialogue box): F3
- Insert the name of a file into an existing Edit window at the caret position: Shift-drag the file's icon onto the Edit window
- Load any text or non-text file into Edit: Shift-double-click
RISC OS 3.7 User Guide - 22 JAN 1997


For example, to search for Ctrl-Z, type in
: This is always case sensitive.
In this case the longest sequence of matching characters is found.
This is useful with wildcard characters in the Find string. For example, if you've searched for
Ambiguous parts are those which could not be exactly specified in the search string; e.g. in the search string
X (Hex button)
You can have one lefthand margin set at a time in Edit. The margin is set in pixels.
Line spacing is set in pixels, and can be a positive or negative value.
'Line' means the string of characters between two presses of Return. If you have not formatted your text, a line in this sense may run over more than one display line.
This tells you the file type, whether it's been modified, the size in characters and creation (or modification) date.