


RISC OS 3.7 User Guide
19 Paint 
Paint is a pixel-based picture editor; you can use it to 'paint' coloured images by applying colours to an area with a variety of brushes and painting tools.
You'll probably find that the easiest way of learning Paint is to read through Basic ideas (on the next page) and then work through the Paint tutorial which follows, before reading the Paint reference section starting on page 297.
Starting Paint
 Paint is in the Apps icon bar directory display. To start Paint and create a new sprite:
- 1 Double-click on the !Paint icon to install it on the icon bar.
- 2 Click on the Paint icon bar icon to display the Create new sprite window.
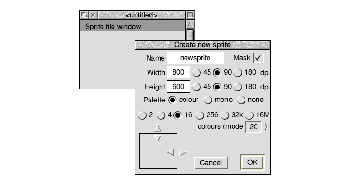
- 3 Fill in the details for your new sprite and click on OK (it's probably best to follow the tutorial starting on page 285 if you don't already know how to do this).
Alternatively, edit an existing sprite file by dragging its file icon to the Paint icon on the icon bar, or by double-clicking on it.
Basic ideas
 The pictures produced by Paint are called sprites.
A sprite is a graphic shape made up of an arrangement of pixels (the smallest unit the screen uses in its current mode). Sprites are stored in sprite files, which can contain more than one sprite. Sprites and sprite files use a standard format, so you can freely export images produced by Paint to other RISC OS applications (such as Draw) that recognise sprites. You can also use Paint to edit sprites produced by other RISC OS applications, and to import and edit JPEG files.
The important difference between Paint and Draw is that, unlike Draw, Paint knows nothing about 'objects' such as rectangles and circles; all it knows is the colour of each pixel in a sprite. Although you can paint regular shapes, you cannot then select them in order to delete, move or resize them.
When you export (save) a sprite from Paint into Draw, this remains true: regular shapes forming part of the sprite cannot be edited like Draw objects. The whole sprite becomes a single object in your Draw diagram; you can move or resize it, but not otherwise edit it.
Choosing colours in Paint
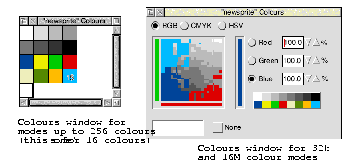
Paint can create and edit pictures in any RISC OS screen mode: 16 million colours, 32 thousand colours, 256 colours, 16 colours, 4 greys and black and white. There are two different ways of choosing colours in a sprite:
- Sprites created in up to 256 colours use a Colours window, familiar to users of previous versions of RISC OS (the following tutorial uses this method - see page 287).
- 32-thousand and 16-million colour sprites make use of the Colours window described in Using colour in applications on page 179.
Creating sprite files compatible with earlier versions of RISC OS
If you want to create sprite files that are compatible with earlier versions of RISC OS, make sure you choose a sprite type that has an equivalent old-type mode number. See page 315 for more information.
Paint tutorial
This tutorial section shows you how to use Paint to produce a small, simple picture, made up of two flowers in diagonal corners. In fact you'll only need to paint one flower, you can then copy it and re-colour it:
You can then use the Pinboard application to repeat this picture all over your screen producing a 'wallpaper' type background:
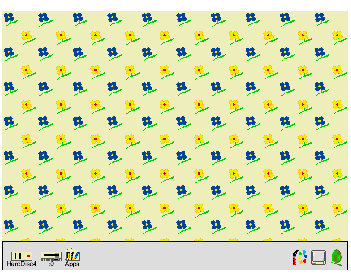
The tutorial is not designed to show you how to use all the Paint tools - in fact it only uses a few - but to give you a general idea of how the application works.
All of Paint's tools are described in detail in the Paint reference section on page 297.
Start Paint
 Start Paint by double-clicking on the Paint icon. As with other RISC OS applications, Paint's icon appears on the icon bar.
Note: Before you start this tutorial, change to a 16-colour square-pixel screen mode such as 800x600 (if you don't know how to do this, see page 13).
Create a new sprite
- 1
 Click on the Paint icon on the icon bar.
This displays the Create new sprite and Sprite file windows. 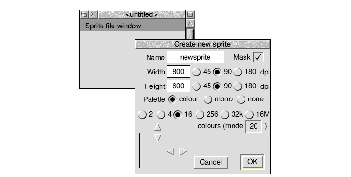
- 2 Delete the existing name
newsprite (using the Delete key) and type in the name for your sprite: Flowers.
- 3 Change both the Width and the Height of the sprite to be 80.
- 4 Make sure the Mask box is ticked.
- 5 Click on OK and your new (blank) sprite is created.
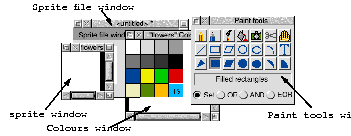
You should now have four Paint windows on your screen:
- the Sprite file window - shows all the sprites in that sprite file
- the sprite window - where you can make changes to the sprite using Paint
- the Paint tools window - contains the tools you can use for painting
- the Colours window - contains the colours you can paint with. (Note that you'll get a different type of colours window when you create a sprite with 32 thousand or 16 million colours - see Using colour in applications on page 179.)
Drag the tools window and the colours window to the right of your screen, and drag the Sprite file window to the bottom left of your screen. Leave the sprite window in the middle of the screen.
Zoom in
The sprite you've just created is very small. To help you see what you're doing, click Menu on the sprite window and change the Zoom factor to 8:1 (see page 305 for more on zooming): 
The blank sprite will now fill most of your screen, and at this magnification a grid is superimposed over the painting area. Each square in the grid represents one pixel.
Create the first flower petal
- 1
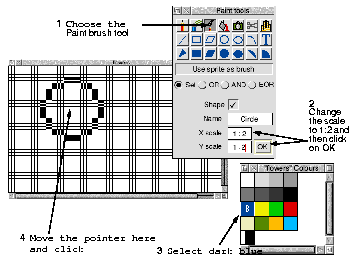
 Choose the Use sprite as brush tool from the Paint tools window (click on it).
The bottom of the tools window will expand to display an area where you can define the type of paint brush you want to use and its size. The default brush type is a circle.
- 2 Reduce the brush size by changing the X scale and Y scale boxes to 1:2, and then click on OK.
- 3 The first flower will be dark blue: Click on the dark blue colour in the Colours window.
That colour will be highlighted and overlaid with the number 8 (to signify that this is colour 8 out of a palette of 16 colours).
- 4 Move the pointer into the sprite window. You'll notice that the pointer is now attached to the centre of a circle. Move the pointer to the approximate position shown below and click. A solid, dark blue circle will appear:
Note: If you accidentally remove either the colours window or the tools window from your screen you can restore them by pressing Menu over the sprite window, and choosing Paint/Show colours or Paint/Show tools.
Save your sprite for the first time
Now is a good time to save your sprite:
- 1 Click Menu over the Sprite file window (not the sprite window).
- 2 Change the name in the Paint/Save/Save as dialogue box to
Flower.
The name of the sprite file appears in the Title bar of the sprite file window.
Note: You should save your work frequently as you proceed. You can then return to the last step if you go wrong. This is an especially good idea with Paint, since with some of the tools you can easily make mistakes. Unlike Draw, you can't undo your work in Paint.
Paint the next three petals
Move the pointer to the centres of the three other circles shown below and click. Don't worry if your circles are in slightly different positions: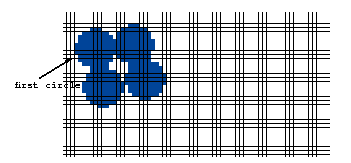
Tip: If you've put a circle in the wrong position don't despair, change the colour to white then paint over the incorrect circle. You can then change the colour back to blue and redo the circle.
Save your work again
Once you're satisfied with your four petals, save your work again before you go on: Just click Menu over the Sprite file window (not the sprite window) and choose Save. You don't need to supply a name this time.
Create the middle of the flower
You need a smaller brush to paint the middle of the flower:
- 3 Change the X scale and Y scale boxes in the Paint tools window to 1:4.
- 4 Select yellow (colour 9) from the Colours window.
- 5 Paint a small circle in the centre of your four petals:

Touch up the centre of the flower
If you find that there are one or two white pixels still in the centre of the flower, you can turn them into dark blue pixels:
- 1
 Choose the Set/Clear pixels tool from the tools window (the icon for this looks like the tip of a pencil).
- 2 Choose dark blue as your current colour.
- 3 Click Select over any white pixels inside your flower.
Save your work again at this point.
Paint the stem
The final step in creating the flower is to paint in a green stem:
- 1 Choose light green (colour 10) from the Colours window.
- 2
 Choose the Set/Clear pixels tool from the tools window (you may already be using this tool if you did any touching up).
- 3 Paint the pixels beneath the flower to look like a stem (click on each pixel in turn).
If you click over one pixel, only that pixel will be coloured. If you drag the pointer while holding down Select button, each pixel it moves over will be coloured: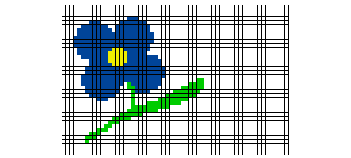
Tip: If you make any mistakes, click Adjust to change the incorrect green pixels back into white ones.
This is another good point to save your work before going on.
Create the second flower
The second flower goes in the bottom right corner of the sprite. However, you don't have to paint a new flower; you can copy the one you've just made:
- 1 Go into the Zoom dialogue box and slightly reduce the magnification factor, then click on the Toggle size icon (in the top right corner of the sprite window) to display the entire sprite.
- 2
 Choose the Copy block tool and make sure the Local option is switched on at the bottom of the tools window.
- 3 Position the pointer at the top left corner of the flower.
- 4 Hold down Select, drag the mouse to the bottom right corner of the flower and release Select. A light blue rectangle will show the block of pixels that you have copied.
- 5 Move the pointer to the bottom right corner of the sprite window and click.
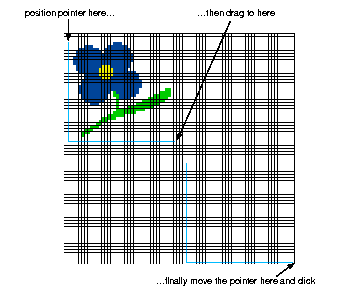
The light blue rectangle will be replaced by a copy of the flower.
Modify the second flower
There are two changes you can make to the second flower to make it clearly different from the first one; change the colour of its petals and centre, and trace around the petals.
Change the colour of the flower
- 1
 Choose the Replace colour tool.
- 2 Choose red (colour 11) from the Colours window.
- 3 Move the pointer over any part of the yellow centre of the flower and click.
The centre will become red.
- 4 Choose yellow (colour 9) from the colours window.
- 5 Move over any part of the blue petals and click. All the blue pixels that touch each other will be instantly changed to yellow pixels.
Trace around the petals
The final change to make to the second flower is to trace around the edge of the petals to give it more impact:
- 1 Choose orange (colour 14) from the colours window.
- 2
 Choose the Set/Clear pixels tool.
- 3 Carefully trace around the outermost yellow pixels of the flower replacing them with orange:
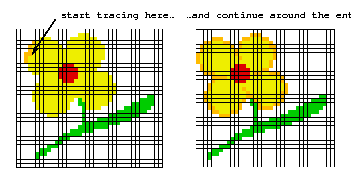
You can click on each pixel individually, or drag the pointer round the edge of the petals in one go.
Change the background colour
The white background will be too stark when you use the flowers to cover your entire screen, so:
- 1
 Choose the Replace colour tool, and switch the Global option on (at the bottom of the Tools window).
- 2 Choose cream (colour 12) from the Colours window.
- 3 Move to any white pixel in the sprite and click.
The entire background of the sprite will be changed to cream.
 Your sprite is now finished, so save it and then close the file.
Turn the sprite into a backdrop
You're now ready to wallpaper your screen with your flower sprite.
- 1 Drag your sprite file (called
Flower) from its directory and drop it anywhere on the desktop background.
Its icon will 'stick' to the desktop background.
- 2 Click Menu over this icon.
The Pinboard menu will appear.
- 3 Choose Make backdrop/Tiled from this menu:

- 4 Your whole screen will now be tiled with your sprite:
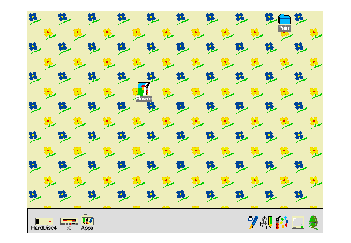
You've finished this part of the tutorial. Take a breather. The next two sections (before the Paint reference section on page 297) show you some advanced tricks you can use.
Painting with a sprite
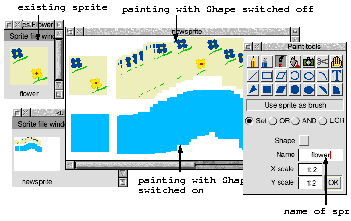
This section, and the next, show you how to create some special effects in Paint. Here's how to use a whole sprite as a brush tool, to produce interesting patterns:
- 1 Open the sprite file called
Flower.
- 2 Now click on Paint's icon bar icon and create a sprite, 400 pixels by 300.
- 3
 In the tools window, choose the Use sprite as brush tool.
- 4 Delete the default name circle, and type in the name of a sprite (in this case - flower).
(The sprite file containing the sprite you want to use as a brush must be open.)
- 5 If Shape is switched on, switch it off.
- 6 Click on OK.
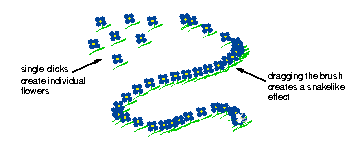
- 7 You can now paint using the sprite as a paintbrush. Clicking once paints a single sprite, and dragging the brush produces a snakelike effect of sprites:
Painting with the mask of a sprite
This section tells you how to use a special colour (a mask) to make parts of a sprite transparent:
- 1 Make sure the sprite file
Flower is open.
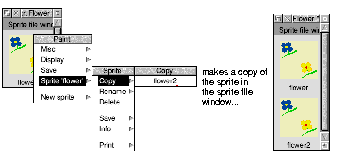
- 2 Click Menu over the Sprite file window and copy your flower sprite - give it the name flower2:
- 3 Open
flower2, choose Edit/Adjust size from the main menu, and change the width of the sprite to 40 pixels.
This will chop off the right half of the sprite leaving only the flower in the top left half of the sprite.
- 4 Now, if it's not already ticked, choose Edit/Mask from the main menu to create a mask colour.
- 5
 Choose the Replace colour tool and click on the Global button.
- 6 Choose the transparent colour (colour T) at the very bottom left of the Colours window - you might need to extend the Colours window down a bit to see it.
- 7 Click on the background of the sprite to fill it with the transparent colour.
- 8 Close the sprite by clicking on the close icon.
- 9
 Click on Paint's icon bar icon and create a new sprite (don't forget to click on OK).
- 10 In the tools window, select the Use sprite as brush tool.
- 11 Delete the default name and type in the name of the sprite you just created - flower2.
- 12 If Shape is switched on, switch it off and click on OK.
- 13 You can now paint individual flowers, which will have a transparent background colour:
You have now completed the Paint tutorial. Save the files you've just created, if you want, or just quit Paint.
The rest of the chapter is a reference section describing the basic elements of Paint, the tools in detail, and how to customise Paint so that it always starts up the way you prefer it.
Paint reference section
 This section tells you in detail how to use Paint, and outlines the terms, concepts and basic techniques for creating and editing sprites. For a brief introduction to Paint and sprites, see Basic ideas on page 284.
Paint has several windows with specialised functions:
- Create new sprite window - Use this to set up a new sprite.
- Sprite file window - Think of this as a sort of Paint 'directory'; it can contain more than one sprite (see page 299).
- Sprite window - This is like any other application window (e.g. a Draw window): It contains the current file (in this case, a sprite) you're editing.
- Colours window - You use this in conjunction with the tools window to change the colour of pixels in a sprite.
- Paint tools window - This contains the different tools you use to edit a sprite's pixels.
Creating a new sprite
To create a new sprite:
- 1 Click on the Paint icon on the icon bar.
- 2 Define the sprite's attributes in the Create new sprite window:
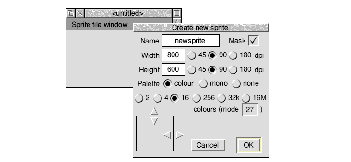
The table overleaf tells you what all the options in this dialogue box mean.
To:
- Name a new sprite: Fill in the Name box. Sprite names can be up to 12 characters long.
- Allow a sprite to use transparent pixels, as well as coloured ones: Switch the Mask option on. This defines an extra 'colour' in the Colours window. Pixels painted in this colour are transparent.
- Define the size of the sprite in pixels: Fill in the Width and Height boxes[1]. The default is the size of the current display.
You can also click on the resize arrows at the bottom of the window.

- Change the pixel size: Choose from 45, 90 and 180 dots per inch (dpi). Larger dpi settings give smaller pixels (hence a smaller canvas).
- Set the number of colours in the sprite: Choose from 2, 4, 16, 256, 32K or 16M.: Usually the same as in the current display mode.
- Define whether the sprite uses a palette: Choose colour for backward compatibility with earlier versions of RISC OS, mono for grey shades or none for the default palette. You can't set a palette in 32K and 16M modes.
Colour sprites with a palette have white as colour 0; mono sprites have black as colour 0. Mono palettes may not display correctly on earlier operating systems.
Note: You can normally ignore the colours (mode) box. If there's a number shown here, the sprite is created as an old format sprite. If it's blank, the sprite created is a new format sprite.
Handling sprite files
It's easy to become confused over the difference between sprites and sprite files. This section shows you how to create and manipulate sprites and sprite files.
 If you prefer, you can keep just one sprite in each sprite file. However, you can store many sprites in a sprite file:
To:
- Open a Sprite file window: Double-click on a sprite file icon, or drag its icon onto Paint's icon bar icon. Shows all sprites in the sprite file at actual size if possible.
- Save a sprite file (and all the sprites it contains): Click Menu over the Sprite file window and drag the Save/Save as icon to a directory display[2]. You can save it under a different name, if you want.
- Create a new sprite in a Sprite file window: Click Menu over the Sprite file window and fill in the New sprite/Create new sprite box. You can also double-click on a blank part of the sprite file window.
- Change the Sprite file window display: Click Menu and choose one of the Display options. This is rather like changing directory displays.
- See information about Paint or the sprite file: Click Menu and display the Misc/Info or Misc/File box. File gives you the sprite file's name, number of sprites and size in bytes.
- See how the sprite would look if used as an icon: Choose Misc/ Use desktop colours. This option is ignored if the sprite has its own palette.
Manipulating sprites within a sprite file
 You can perform various operations on the sprites in a Sprite file window:
To:
Adding an existing sprite to a sprite file
There are three ways of adding an existing sprite to a different sprite file:
- Drag a sprite file icon and drop it onto the destination Sprite file window.
If the source sprite file contains many sprites, they're all added to the destination Sprite file window. Sprites with the same name will be overwritten.
- Click Menu over a sprite's picture in the source Sprite file window and drag the Sprite '
name'/Save/Save as icon onto the destination Sprite file window.
- Click Menu over an open Sprite file window and drag the Sprite/Save/Save as icon onto the destination Sprite file window.
Handling JPEG images
 You can also use Paint to edit JPEG images. To load a JPEG file into Paint, drag the JPEG file icon onto Paint's icon bar icon.
The image will be converted into a sprite in the current screen mode. This means that it will be given the same number of colours as the current mode, so make sure you change to the correct mode before you load the image.
If you drag a JPEG file onto Paint's icon, a Sprite file window, a sprite window and a colours window will all open, ready for you to edit the image.
Notes:
- Paint may automatically perform some dithering when you load a JPEG file. You can often get a better quality sprite by using ChangeFSI to process the JPEG file and saving the resulting sprite into Paint.
- Once you've loaded a JPEG file into paint, you cannot use Paint to change it back into a JPEG file. You can use ChangeFSI to do this, though - see Output options on page 346.
- If you double-click on a JPEG file, it will be loaded automatically into ChangeFSI. This may not happen if your computer is low on memory. You can display a JPEG using less memory by loading it into Draw.
Choosing and using colours
You use the Colours window to choose the colour that you are painting with. There is a separate Colours window for each sprite. To open the Colours window (if it's not already displayed) click Menu on the sprite window and choose Paint/Show colours.
There are in fact two different Colours windows (see Using colour in applications on page 179 for details on the second of these two windows):
Choosing a colour
To choose a colour, click on it in the Colours window.
For sprites with up to 256 colours, the current colour is highlighted in the colours window, and shows the colour number. The colours shown are the shades that can be displayed in the current screen mode. These may be an approximation to the actual palette of the sprite (see Mixing new colours using a palette on page 304).
Finding out the colour of an individual pixel
Another way to choose a colour is to point at a pixel in the sprite window, click Menu and choose Paint/Select colour. You can use this method to find out exactly which colour has been used to paint the pixel.
Making the Colours window smaller
You can make the Colours window smaller by clicking Menu over the sprite window and choosing Paint/Small colours. This toggles the size of the sprite colours window; the colours window must be open. The small colours window takes less screen space than the large one. This is particularly valuable in 256-colour modes.
Using a transparent mask
If a sprite with up to 256 colours has a mask, an extra, special colour is shown in the bottom lefthand corner of the sprite colours window as a shaded square.
If a 32-thousand or 16-million colour sprite has a mask, you will be able to select it by choosing None in the bottom of the Colours window.
Adding a mask
If a sprite doesn't have a mask, you can add one by clicking Menu over the sprite window and choosing Edit/Mask.
For more information about using masks, see
Set causes the colour itself to be painted into the sprite. The remaining three styles cause the indicated logical operation to be applied between the colour number of the pixel on the screen and that selected in the Colours window.
For example, if you choose EOR, spraying with colour 11 (binary 1011) onto an area that is currently colour 12 (binary 1100) will produce pixels in colour 7 (binary 0111). For a description of logical operations, see the BBC BASIC Reference Manual.
- OR sets more pixels towards the higher numbered colours in the palette.
- AND sets more pixels towards the lower numbered colours in the palette.
- EOR maintains a wider variety of colours than OR or AND.
You can set a sprite's palette by dropping a palette file onto the sprite window - see page 305 for more on saving palette files.
The most interesting effects are achieved when spraying over a range of existing colours, or drawing overlapping filled shapes. Experiment for yourself!
Mixing new colours using a palette
For 32K and 16M-colour sprites, you can paint a pixel in virtually any colour by choosing it from the Colours window. However, sprites which use 256 colours or less only have a limited range of colours to choose from. In such cases, if a sprite has a palette, you can use it to mix new colours.
Giving a sprite a palette
If a sprite doesn't have its own palette, and you want to give it one, click Menu over the sprite window and choose Edit/Palette. Sprites which don't have their own palettes use the default desktop palette for a given mode (unless Display/Use desktop colours is off, in which case the old BBC colours are used).
By default, when you create a new sprite, it is given a palette.
Notes:
If you want to use a sprite as a tiled backdrop, it should not have a palette.
If you intend to export a sprite to Draw, you should give it a palette (otherwise it won't retain the colours you give it).
Redefining colours (editing a palette)
This method works for all sprites with up to 16 colours, and with 256-colour sprites with true-colour palettes.
- 1 Click on the colour in the Colours window that you want to change.
- 2 Click Menu over the sprite window and display the Paint/Edit palette/Edit colour box.
- 3 Mix a new colour and click on OK to redefine the Colours window.
Using colour in applications on page 179 tells you how to mix colours. The colour displayed is the best approximation available in the current screen mode to the shade you select. The exact colour is recorded by Paint; it is displayed more accurately if you change to a mode with more colours.
256-colour sprites with colour palettes
The one exception when mixing new colours is a 256-colour sprite with a colour palette (as opposed to a true-colour palette). In order to be able to edit such a sprite's palette, you need to save its palette back into the sprite window (see below). Alternatively, you can create a 256-greyscale sprite and edit its palette.
Saving a palette
To save a sprite's palette:
- 1 Click Menu over the sprite window and display the Save/Palette box:

- 2 Drag the Save as icon to a directory display.
If you want to use the same palette in another sprite, drag this palette file onto the new sprite window. This modifies the palette used by the sprite.
Creating an extended colour fill (ECF)
Note: ECFs are only really provided for backwards compatibility. We don't recommend that you use them.
To create an ECF, click Menu over the sprite window and choose Paint/Select ECF. This leads to a dialogue box which you can use to extract the bottom lefthand pixels of a named sprite as an ECF pattern. ECFs are patterns that you can use in place of a colour, and are added to the sprite palette, below the plain colours.
You can't define an ECF for sprites with more than 256 colours. You can define up to four ECFs for each sprite.
Zooming in and out (scaling a sprite window)
 To scale the size of a sprite window to make it easier to edit, press Menu over the sprite window and set a zoom factor in the Zoom/Magnifier dialogue box:
The magnification only changes the size at which the sprite is displayed in the window; the actual definition, height and width are not affected. The magnification is expressed as a ratio; for example 2:1 means twice normal size, 3:4 means three-quarters of normal size, and so on. You can change the ratio either by clicking on the up and down arrows, or by typing in a new value at the caret.
Using a grid
 You can use a grid to see the boundaries between individual pixels in a sprite:
To:
- Toggle the grid on or off: Press Menu over the sprite window and choose Grid.
- Change the grid's display colour: Press Menu over the sprite window and choose a colour from the Grid submenu.
The grid is displayed at different magnifications for sprites of different sizes (so for example, you might only see the grid at zooms of 3:1 or higher for one sprite, but at zooms of 5:1 or higher for another).
Using Paint's tools
You choose tools from the Paint tools window to edit a sprite (or JPEG file).
If, when you open a sprite for editing, the tools window doesn't appear on the screen, you can display it by clicking Menu on the sprite window and choosing Paint/Show tools.
The top section of the window shows the tools. The currently-selected tool is highlighted and its name shown below the icons.
Below this are buttons used to define how colour will be applied to the image. When certain tools are selected, an extension may appear at the bottom of the tools window for setting extra parameters.
Choosing tools
To use a tool to edit a sprite:
- 1 Click on the tool in the Paint tools window.
- 2 If you want, set or change any parameters, such as the size of the spray or brush to be used.
- 3 Choose a colour from the Colours window.
- 4 Move the mouse to the sprite window, and apply the tool as described below.
For operations such as drawing lines and rectangles, you can click Adjust instead of Select. This moves the point you just set to the current position.
While some operations are in progress, a skeleton line or area is shown.
You can cancel any of the sequences of operations described below by clicking again on the current tool in the Paint tools window.
To
Choose this toolNotes
Paint a pixel:  Set/clear pixels: Click Adjust to clear a pixel to colour 0. Set/clear pixels: Click Adjust to clear a pixel to colour 0.
Drag the pointer to paint many pixels.
Spray pixels in an area around the pointer position:  Spray can: Set the spray Density and Radius at the bottom of the tools window. Spray can: Set the spray Density and Radius at the bottom of the tools window.
Spray with Adjust to clear pixels to colour 0.
Paint another sprite into the current one:  Use sprite as brush: See Using a sprite as a brush on page 309. Use sprite as brush: See Using a sprite as a brush on page 309.
Replace one colour with another ( flood fill):  Replace colour: Local changes all touching pixels of the same colour. Replace colour: Local changes all touching pixels of the same colour.
Global changes all similarly- coloured pixels in the sprite.
Copy a rectangular block from one part of a sprite to another:  Copy block Copy block
(switch Local on): Drag a select box around the block to be copied. Click to position the copied block.
Save (export) a rectangular block of a sprite:  Copy block (switch Export on): Drag a select box around the block to be copied. Drag the Save as icon to a directory or sprite file. Copy block (switch Export on): Drag a select box around the block to be copied. Drag the Save as icon to a directory or sprite file.
Move a rectangular block from one part of a sprite to another:  Move block (switch Local on): Works in the same way as Copy block (Local), but area left behind is filled with colour 0. Move block (switch Local on): Works in the same way as Copy block (Local), but area left behind is filled with colour 0.
Save (export) a rectangular block of a sprite:  Move block (switch Export on): Works in the same way as Copy block (Export). Move block (switch Export on): Works in the same way as Copy block (Export).
Move the entire sprite within the sprite window:  Move whole sprite: Drag pointer to new position in sprite window. Any parts of image which move outside window are lost. Move whole sprite: Drag pointer to new position in sprite window. Any parts of image which move outside window are lost.
Paint a solid line of pixels:  Lines: Click at each end of the line. Lines: Click at each end of the line.
Paint a solid triangle :  Filled triangles: Click on each corner of the triangle. Filled triangles: Click on each corner of the triangle.
Paint an outline or solid rectangle:  Rectangle outlines Rectangle outlines
Filled rectangles : Click on opposite corners of the rectangle.
Paint an outline or solid parallelogram:  Parallelogram outlines Parallelogram outlines
Filled parallelograms: Click on three corners of the parallelogram.
Paint an outline or solid circle :  Circle outlines Circle outlines
Filled circles : Click at the centre, then on the circumference.
Paint an outline or solid ellipse :  Ellipse outlines Ellipse outlines
Filled ellipses : Click at the centre. Second click defines the width.
Paint an arc or solid circular segment :  Circle outline sections Circle outline sections
Filled circle segments: Click to define the centre of a circle, then click at each end of the arc.
Paint a solid circular sector:  Filled circle sectors: Click to define the centre of a circle, then click at each end of the arc. Filled circle sectors: Click to define the centre of a circle, then click at each end of the arc.
Paint a text line onto a sprite:  Insert text Insert text
: Enter the text, character sizes (pixels) and spacing (pixels) in the tools window. Click to define centre of text line. Only System font is available.
Using a sprite as a brush
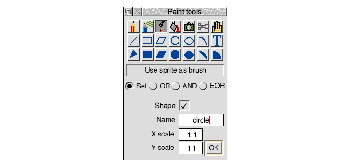
 Here's a bit more on using a sprite as a brush (there are a couple of examples of using this tool in the Paint tutorial, on page 294): Here's a bit more on using a sprite as a brush (there are a couple of examples of using this tool in the Paint tutorial, on page 294):
To:
- Use one of the default brush shapes: Type one of the default names into the Name box and click on OK. You can use
square, triangle, circle or brush.
- Use one of your own sprites as a brush: Open the Sprite file window and type the sprite's name in the Name box and click on OK.
- Use just the outline of the source sprite: Switch Shape on and click on OK. Pixels in brush sprite which are not transparent are set to the current colour.
- Paint with the full coloured sprite image: Switch Shape off and click on OK.
- Use the source sprite at a different size: Set the X scale and Y scale multipliers and click on OK. This is useful for using the same source sprite at different sizes.
Changing a sprite's size, shape and orientation
 You can perform many operations on a sprite using Paint's Edit menu (click Menu over a sprite window and choose from the Paint/Edit submenu): You can perform many operations on a sprite using Paint's Edit menu (click Menu over a sprite window and choose from the Paint/Edit submenu):
ToUse this option or submenuNotes
Invert a sprite vertically about its centre: Flip vertically
Invert a sprite horizontally about its centre: Flip horizontally
Rotate a sprite about its centre: Rotate Enter the angle in the Rotation box. Enter the angle in the Rotation box.
The sprite size changes if you rotate for angles other than multiples of 90 degrees (unless the sprite has an even aspect ratio and pixel height/width).
Scale the sprite horizontally or vertically: Scale x or Scale y Enter the scale factor in the Factor box. Negative scale factors are not allowed. Enter the scale factor in the Factor box. Negative scale factors are not allowed.
Slant the sprite horizontally: Shear Enter the shear factor in the Shear box. Enter the shear factor in the Shear box.
The top row of pixels is moved right. The rows in between are moved proportionally. The factor is the tangent of the angle you want to shear by. A factor of 1 slants the sprite 45�.
Add or delete rows or columns from the top or right edge of a sprite: Adjust size Use the arrows in the Sprite size box, or fill in the Width and Height boxes, and click on OK. Use the arrows in the Sprite size box, or fill in the Width and Height boxes, and click on OK.
Add or delete columns at the pointer position: Insert columns Insert rows Delete columns Delete rows Inserted rows or columns are filled with colour 0. Inserted rows or columns are filled with colour 0.
Columns are deleted to the right of the pixel over which you clicked Menu. Rows are deleted upwards. See below for more information.
More on adding and deleting rows and columns
Enter the number of rows or columns in the How many? box and click Select or press Return. Alternatively, without passing over a menu, move the pointer over the sprite window to change the size of the highlighted area that appears and click when the How many? box shows the right number.
Deleting the column of pixels on the righthand edge of a sprite can be difficult. Increasing the zoom scale can help, or you can delete the last column separately by using Adjust size to decrease the width by 1 column.
Taking screen snapshots
You can use Paint to save part of the screen as a sprite file (this is how the pictures of menus, windows and so on were produced in this User Guide).
 Start snapshot by choosing Snapshot from the icon bar menu. This displays the snapshot dialogue box: Start snapshot by choosing Snapshot from the icon bar menu. This displays the snapshot dialogue box:
To Do thisNotes
Take a snapshot of the whole screen: Tick the Grab whole screen box and click on OK. Drag the resulting Save as icon to a directory display.
Take a snapshot of part of the screen:  Switch Grab whole screen off and click on OK. Then drag a select box (using the camera pointer that appears) round the area you want to snapshot. Drag the resulting Save as icon to a directory display. Switch Grab whole screen off and click on OK. Then drag a select box (using the camera pointer that appears) round the area you want to snapshot. Drag the resulting Save as icon to a directory display.
Set a delay before the snapshot is taken: Switch on User defined in the Delay before snapshot area and enter the delay in seconds. Then take the snapshot as above. This allows you to take shots of transient items (like menus): while the timer is counting down, you can position menus etc. in the snapshot area you defined.
Printing a sprite
Before you can print a sprite, you must have the Printer manager loaded. There are two ways you can print a sprite:
- Click Menu over the sprite's picture in the Sprite file window and display the Sprite/Print/Print sprite dialogue box.
- Click Menu over the sprite window and display the Misc/Print/Print sprite dialogue box.
The dialogue box is the same in both cases. The exact contents of the dialogue box depend on the printer driver in use, but it typically allows you to choose the orientation (Portrait or Landscape) scaling, and position on the paper. 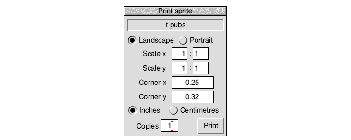
Scale allows you to change the proportions of the printed image. Setting both x and y to 1:2 will produce a half-sized image.
Corner defines where on the printed page the image will be printed. The default settings define the edge of the printable page for your printer. Changing these settings will move the printing position of the image.
Saving Paint features in a Desktop boot file
 You may want to change some aspects of the way new Paint windows appear when you first open them. For example, a new window normally opens with Zoom magnification set to 1:1, but you may prefer to have the Zoom option set to 2:1 each time you start Paint. You may want to change some aspects of the way new Paint windows appear when you first open them. For example, a new window normally opens with Zoom magnification set to 1:1, but you may prefer to have the Zoom option set to 2:1 each time you start Paint.
You can set features of this type by setting up Paint as you want to use it, then save these features by creating a Desktop boot file. Instructions on how to create a Desktop boot file are given in Configuring applications on page 427.
There are several features of Paint that you can set before saving a Desktop boot file, so that they are set up the way you want them each time you switch on.
Types of sprite that can be created by Paint
This table gives the various types of sprite that can be created by Paint. It shows if
- they are backward compatible with RISC OS 3.1 and earlier versions of the operating system - they have a mode number
- they can be modified by Paint.
You can select these combinations using the Create new sprite window. See page 297 for more information.
Number of coloursDots per inch (dpi)Equivalent old mode number
Two: 90x90 : 25
: 45x45: not backward compatible
: 90x45: 0
: Other combinations: not backward compatible
Four: 90x90 : 26
: 45x45: 1
: 90x45: 8
: Other combinations: not backward compatible
Sixteen: 90x90 : 27
: 45x45: 9
: 90x45: 12
: Other combinations: not backward compatible
256: 90x90 : 28
: 45x45: 13
: 90x45: 15
: Other combinations: not backward compatible
32K: All combinations: not backward compatible
16M: All combinations: not backward compatible
Note: If you create a sprite file on your computer containing a sprite with no mode number, be careful if you use it with an older Acorn computer running RISC OS 3.10 or earlier, as switching to the brush tool in Paint on RISC OS 3.10 or earlier whilst editing the sprite file will cause Paint to crash.
This sort of file is easy to identify, as at least one of the sprites will fail to show in the sprite file window on those versions of Paint.
You can find out if your sprite file has a such a sprite by displaying the sprite file window using the Full info menu option.
[1] For very large sprites (height greater than 1024 pixels) some Paint tools may not work properly (e.g. Replace colour).
[2] If you drop the Save/Save as icon onto another Sprite file window instead, any existing sprites in that window with the same name will be replaced.
RISC OS 3.7 User Guide - 22 JAN 1997
    
|
Your sprite is now finished, so save it and then close the file.
If you prefer, you can keep just one sprite in each sprite file. However, you can store many sprites in a sprite file:
Set/clear pixels: Click Adjust to clear a pixel to colour 0.
Spray can: Set the spray Density and Radius at the bottom of the tools window.
Use sprite as brush: See Using a sprite as a brush on page 309.
Replace colour: Local changes all touching pixels of the same colour.
Copy block
Copy block (switch Export on): Drag a select box around the block to be copied. Drag the Save as icon to a directory or sprite file.
Move block (switch Local on): Works in the same way as Copy block (Local), but area left behind is filled with colour 0.
Move block (switch Export on): Works in the same way as Copy block (Export).
Move whole sprite: Drag pointer to new position in sprite window. Any parts of image which move outside window are lost.
Filled triangles: Click on each corner of the triangle.
Ellipse outlines
Circle outline sections
Filled circle sectors: Click to define the centre of a circle, then click at each end of the arc.
Here's a bit more on using a sprite as a brush (there are a couple of examples of using this tool in the Paint tutorial, on page 294):
Enter the angle in the Rotation box.
Enter the scale factor in the Factor box. Negative scale factors are not allowed.
Enter the shear factor in the Shear box.
Use the arrows in the Sprite size box, or fill in the Width and Height boxes, and click on OK.
Inserted rows or columns are filled with colour 0.
Start snapshot by choosing Snapshot from the icon bar menu. This displays the snapshot dialogue box:
Switch Grab whole screen off and click on OK. Then drag a select box (using the camera pointer that appears) round the area you want to snapshot. Drag the resulting Save as icon to a directory display.