


RISC OS 3.7 User Guide
1 The desktop
The Welcome Guide provides an introduction to the desktop, and to the basic tasks of loading, saving, copying, moving and deleting files, etc. This chapter expands on the Welcome Guide, covering the desktop and Filer in much more detail.
Manipulating windows
First, here's a reminder of how to use the various window icons: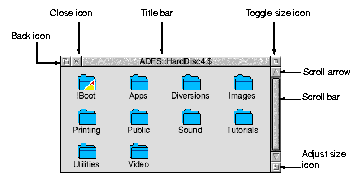
To:
- Move a window to the back of a stack:
 Click on the Back icon.
- Bring a window to the front of a stack : Click on the Title bar. You can also click on the Adjust size icon.

- Close a window:
 Click on the Close icon. Shift-click to iconise the window (see page 20).
- Change a window's size:
 Drag the Adjust size icon. You can also click on the Toggle size icon.
- Bring the icon bar in front of a window: Press Shift-F12. Toggles the icon bar in front/behind windows.
- Move a window: Drag the Title bar. Dragging with Select brings a window to the front. Dragging with Adjust maintains its position in a stack.
- Scroll through a file step by step:
 Click on a Scroll arrow. Click either side of a Scroll bar for larger steps. Click Adjust to scroll in the opposite direction.
- Scroll through a file screen by screen: Click above or below the Slider. Click Adjust to scroll in the opposite direction.
- Display a different part of a file: Drag the Slider. Drag Adjust to scroll horizontally and vertically.
NB: If desktop icons change appearance unexpectedly, it is probably due to an application redefining desktop sprites. You should upgrade to a newer version of the application.
Directory displays
 Information stored in the computer is shown on the screen in directory displays. Clicking on the icon for a particular information storage device (such as a disc drive) opens the root directory display for that device. For example, here's the root directory display for a hard disc:
The basic techniques used to move around the files and directories have already been introduced in the Welcome Guide in the chapter Files and directories. This section recaps on those techniques, and describes some more advanced operations.
Opening and closing directory displays
Here's a summary of how to open and close directory displays on the desktop:
To:
- Open a directory display:
 Double-click on the directory icon.
- Open a directory display without running internal files of applications:
 Hold down Ctrl and double-click on the directory icon. This speeds up the opening of large directories, and saves memory. Application icons are replaced by the generic RISC OS application icon.
- Open a subdirectory, and simultaneously close its parent:
 Double-click Adjust on the subdirectory icon.
- Close a directory display and open its parent:
 Click Adjust on the Close icon. You can also press Menu over the directory display and click Adjust on Filer/Open parent. This option is not available from the root directory, or from the user root directory of a file server (in this case, use Open $ from the icon bar menu of the file server icon).
- Open an application directory:
 Shift double-click on the application directory icon. This opens the application directory without actually running the application.
- Bring an open directory display to the front:
 Double-click on the icon for the directory. You can Shift double-click to close any subdirectories.
- Close a directory display :
 Click on the Close icon. You can also Shift double-click on the directory icon
- Close a directory display, leaving its icon on the pinboard:
 Shift click on the Close icon. See Using the Pinboard on page 20.
Note: If a subdirectory is 'buried' too deeply in the overall directory structure, you may not be able to open it. See Pathnames on page 30.
The Apps directory
 When you click on the Apps icon on the icon bar you see a directory display containing some of the most frequently used Acorn applications (these are described from RISC OS applications on page 173).
Changing information in directory displays
 You can change the way file and directory information is shown in directory displays using the Filer/Display menu (there's more on this in The Filer on page 10).
Changing the icon size and displaying file information
To:
- Show files etc. in directories with large icons (but no file information): Choose
Filer/Display/Large icons.
- Show files etc. with small icons (but no file information): Choose
Filer/Display/Small icons.
- Show all information on files in a directory display: Choose
Filer/Display/Full info.
Full info gives you lots of information about a file:
Changing the sort order of files in a directory display
You can change the order in which objects are shown in directory displays:
To:
- Sort files in alphabetical order: Choose Filer/Display/Sort by name.

Files are sorted by name, in ascending alphabetical order.
- Group files according to type: Choose Filer/Display/Sort by type.

Undated files appear first, then dated files in numerical order of file type, then applications, and finally directories.
- Sort files according to size: Choose Filer/Display/Sort by size.

Files appear first, followed by applications then directories, sorted in descending order of size. (Directories are only in alphabetical order.)
- Sort files in order of creation: Choose Filer/Display/Sort by date.

The most recent appear first.
The new sort order will be applied to any directory displays you open afterwards. This same format is also kept when you reboot or restart your computer.
Selecting files and directories
Here's how to select or deselect icons in a directory display:
To:
- Select a single icon:
 Click on it.
- Select a group of icons :

 Click Select or Adjust on the first icon, and Adjust on each of the others in turn. You can also drag a box round a group of icons. Use Adjust to deselect unwanted icons or to select additional icons.

- Select all icons in a directory display:
 Press Menu, choose Filer/Select all. There's more on the Filer menu on page 10.
- Deselect an icon:
 Click Adjust on it. Useful for selecting many icons in a display: choose Select all then click Adjust on unwanted icons.
- Deselect a group of icons :
 Press Menu, choose Filer/ Clear selection. You can also click over a blank part of the directory display.
Once you've selected an icon, or a group of icons, you can perform various Filer operations on that selection. See The File, Dir., App. or Selection submenu on page 10.
Creating a new directory
To create a new directory:
- 1 Open a directory display within which you want to create the new directory.
- 2
 Press Menu and type the new directory name into the New directory writable icon.
- 3 Click on the name or press Return.
A name must contain at least one, and at most ten, printing characters. The name must not contain a space or any of the following characters:
$ & % @ \ ^ : . , # * " |
The Filer
The Filer is the part of the desktop that handles operations on files and directories, such as selecting, copying, deleting, moving and so on. This section tells you how to use the Filer to manipulate files and directories, and how you can modify its behaviour.
Filer operations normally run 'in the background', so that you can carry out other desktop activities while copying, searching, deleting and so on.

Note: If the computer is running out of memory (e.g. if you're running several applications) the Filer may not be able to continue in the background: It suspends other activities while it completes a task, and the normal message boxes are replaced by larger, simpler, windows.
The Filer menu
 Click Menu anywhere over a directory display to show the Filer menu.
Some operations when applied to a directory (such as copying and deleting) apply recursively to all objects within that directory. If any of those objects are themselves directories, the operation applies to their contents as well (and so on). Moving an application, for example, will move all of it: its directory and all its contents. So think, especially before you delete a directory!
Although you can run several Filer operations simultaneously, you should not run more than one operation on the same file or directory at the same time. For example, don't copy or move files into a directory while at the same time deleting existing files from the same directory - you may lose files or data.
The File, Dir., App. or Selection submenu
Once you've selected an icon or icons (see Selecting files and directories on page 9) you can use the Filer menu to perform various operations on your selection.
- If you select a directory icon, the File option changes to Dir.
- If you select an application icon, the File option changes to App.
- If you select more than one icon, the File option changes to Selection.
Copying, moving and deleting files
 You've seen how to open and close directory displays, select icons in a directory display, and how to control Filer menu operations. This section tells you how to manipulate your files, directories and applications using the Filer.
Note: For simplicity, this section refers to operations on a File, but most of the operations apply equally to a directory, an application, or a selection (see The File, Dir., App. or Selection submenu on page 10).
To:
- Copy a file: Drag the file's icon to the destination directory.
- Copy a file with a different name: Change the name in the File/Copy/Copy as writable menu box and click on OK.
 To copy to a different directory, drag the Copy as icon to the destination directory display.
- Move a file: Hold down Shift while dragging the file's icon to the destination directory. This will copy the file and delete the original from the source directory.
- Move a large selection from one floppy to another: Copy the selection then Delete the originals. You can also use a RAM disc (see page 96).
- Rename a file: Type the new name in the File/Rename/New name writable menu box.
 Filenames can be one to ten characters long. They mustn't contain spaces or any of these characters:
$ & % @ \ ^ : . , # * " |
Most filing systems are not case sensitive (the NFS filer is case sensitive, and filenames can exceed ten characters).
- Rename a file on a DOS disc or partition: Type the new name in the File/Rename/New name writable menu box.
- Delete a file: Choose File/Delete. You can't retrieve deleted files!
- Delete a locked file: Choose File/Access/Unprotected before deleting the file. You can override all file locks permanently by choosing Options/Force. Always turn this option off after you've used it; see page 28.
Note: When copying files to a 'Full info' directory display, you'll see blank icons appear with the word 'DEADDEAD' displayed on the line. When the file copying completes, these words and the blank icon are replaced by the filename and icon.
Information and help
You can use the Filer menu to find out more information about your selection, or get help on an application:
To:
- Find the total size of a file or selection: Choose File/ Count to see the number of files and their total size.
 There are 1024 bytes in a kilobyte and 1024 kilobytes in a megabyte. A 1.6MB format disc doesn't hold 1.6 x 1024 kilobytes: it actually holds 1600 kilobytes.
- See information about a file: Choose File/Info.
 This displays the file type, size, access details and date last modified - information similar to that shown when you choose Display/Full Info (see page 7).
- Get help on an application: Select the application and choose App./Help. Not all applications support this. You can also use the !Help application - see page 357.
Desktop colour and resolution
 You can change the number of colours displayed, and the size of the desktop, using the Display manager. The Display manager icon is on the righthand side of the icon bar, next to the Task manager (see page 61).
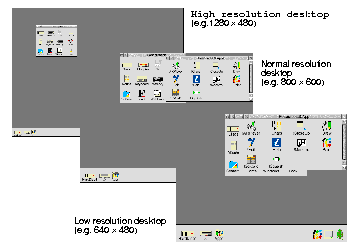
The 'resolution' is amount of information displayed on the computer screen:
- The higher the resolution, the more information on the screen, so the better the displayed quality of the applications and pictures on your computer.
- The higher the resolution, the more of an application or picture that can be viewed in the same screen space.
(Don't confuse resolution with the dot pitch of the monitor, which is fixed.)
The desktop itself only uses up to 16 colours, so you won't notice an immediate difference in appearance if you change to a 256-colour display (or greater). However you will see a difference if you display a sprite picture that uses many colours, or use an application such as !Draw that allows you to use many colours.
The following pictures show the same desktop at different resolutions:
How colour and resolution interact
As you experiment with the Display manager, you'll find that you can only display certain combinations of colours and resolutions. These combinations are limited by the computer, the amount of video memory (if any) it contains and the capabilities of your monitor (defined in !Boot - see Screen on page 40).
The Display manager assumes that the most recent change you make is the most important. If you choose a higher resolution, the Display manager may have to reduce the number of colours correspondingly. If this happens, it will try to pick the maximum number of colours possible at that resolution.
Similarly, if you choose a large number of colours, the Display manager may have to reduce the resolution at which it can display these colours. If this happens, it finds the highest resolution at which this number of colours is possible. The Display manager does not always pick the optimum resolution and you may have to change to a more appropriate resolution for the desktop.
Changing the desktop display characteristics
 Clicking on the Display manager icon on the icon bar shows the Screen display window, which you use to change the resolution and the number of colours for the current session. The information shown in the window gives the current settings of the desktop:
To:
- Change the number of colours or greyscales used in the desktop display:
 Click on the Colours menu icon, choose a number from the list and click on Change.
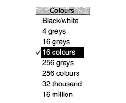 To see any difference for more than 16 colours, you'll need to run an application or display a picture that takes advantage of the higher number of colours available.
- Change the resolution:
 Click on the Resolution menu icon, choose the resolution you want and click on Change.
 The resolutions you can select depend on the type of monitor you are using. The monitor type is defined in the Screen configuration menu (see page 40).
Note: Every time you switch on, the display will revert to the permanent settings defined in !Boot (see Screen on page 40). The Display manager only changes the screen for the current session.
Advanced display options
Normally you won't need to use the information given in this section.
Mode string
The mode string defines the current screen display mode:
The mode string is made up of
X: horizontal resolution
Y: vertical resolution
C: number of colours
G: number of greyscales (16 or 256)
EX: horizontal EIG value
EY: vertical EIG value
F: frame rate (optional)
You can change the EIG values to change the size of the desktop, or you can replace the whole string by an old type mode number (see page 17).
Changing the desktop size without changing the resolution
You can use the EIG factor to change the apparent size of the desktop, making everything displayed on the desktop smaller or larger than it should be: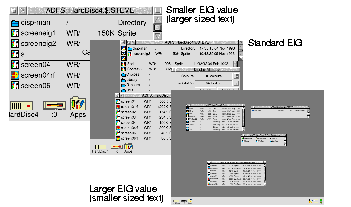
EIG stands for External-to-Internal Graphics. The EIG factor works as follows:
0 = larger than normal
1 = normal size
2 = smaller than normal size
3 = even smaller
Making everything larger can be useful if you want over-large text on the desktop. Making everything smaller allows you to fit more on the desktop, but reduces the definition of the desktop (less pixels are used to display the same information).
- 1 Click Menu over the Display manager and move to the Mode dialogue box.

- 2 Move the cursor to the mode string and change the EX and EY EIG values.
For example, to make the size of the desktop smaller, change
X640 Y480 C16 EX1 EY1 F73
to X640 Y480 C16 EX2 EY2 F73
- 3 Click on OK for the new EIG values to take effect.
Notes: The EIG values are changed back to their default values whenever you use the Display manager to change display modes. Some of the more extreme EIG values may not work with all applications.
Using old type mode numbers
You can still display screen modes using the mode numbers associated with RISC OS 3 version 3.1 and earlier by typing the mode number directly into the mode box on the icon bar:
A list of old type RISC OS 3 version 3.1 screen modes appears in Old-type screen modes on page 449. Some of these modes may not be available on your monitor.
Note: If your monitor cannot display a given mode, the display manager will automatically choose a mode with the same number of colours. If the mode is supported by your hardware but not the desktop, you'll see an error message.
Display characteristics
Square pixel modes
Square pixel modes are the most useful for everyday use; they maintain the correct proportions of images on the desktop. The main square pixel modes are
- 640 x 480
- 800 x 600
- 1024 x 768
- 1280 x 1024.
(Your system may not be able to display all of these).
Rectangular pixel modes
Rectangular modes do not maintain the correct proportions of the desktop. Some examples of these are
Changing the amount of Video RAM
Note: Not all RISC OS computers can use VRAM.
When you change the amount of VRAM in your computer, the defaults you have set with the !Boot/Screen configuration window may need changing (see page 40).
VRAM upgrade kits, together with full instructions on how to perform the upgrade, are available from your supplier for certain Acorn models. Your Welcome Guide will tell you whether you can install VRAM in your computer.
The Pinboard
This section shows you another useful part of the Filer: the Pinboard. The Pinboard adds another dimension to the desktop and the Filer. For example, you can
- pin file, directory and application icons to the Pinboard, to save having lots of directory displays open
- double-click on these pinned items to activate them just as you would if they were in a directory display
- move files around on the Pinboard
- display a picture on the background (a backdrop)
- shrink application windows and directory displays to icons to save space on the desktop.
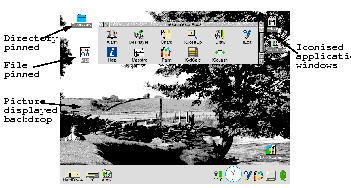
Using the Pinboard
This section shows you how to use the Pinboard. The techniques you'll need are much the same as those used in normal file operations.
To:
- Pin an icon to the Pinboard:
 Drag the icon from a directory display and drop it on the background (not the icon bar). You can pin icons for files, directories and applications. Drag icons to reposition them.


- Open a directory display from a pinned directory icon:
 Double-click on the pinned directory icon. The pinned icon will stay on the pinboard.
- Start an application from its pinned icon:
 Double-click on the pinned application icon.
- Load a file from its pinned icon:
 Double-click on the pinned file icon. This also starts the application, if it's been seen by the filer.
- Select a group of icons on the pinboard:
 Click each icon with Adjust, or drag a selection box around them all. You can also use Pinboard/Select all. See page 21.
- Copy a selection from the Pinboard to an open directory display: Drag and drop the selection onto the destination directory display. Your selection can include icons from different parent directories. You can't move files from the Pinboard to a directory display.
- Iconise (close) an open directory display or active application window to an icon on the Pinboard:
 Hold down Shift and click on the Close icon. This saves cluttering the desktop with open windows. When you reopen an iconised window, the icon disappears from the Pinboard.


NB: Quitting Pinboard from the Tasks display will cause unsaved data in iconised windows to be lost.
Pinboard menu options
 Like the Filer, the Pinboard is controlled by a menu. To display the menu options, press Menu anywhere over the desktop background. To see the options available for a particular icon on the background, select the icon and press Menu (or press Menu over the icon when there is no other selection).
To:
Using backdrop pictures
 You can display any sprite file (see Paint on page 283) as a backdrop picture on the desktop. For best results, use a screen mode that can display at least the same number of colours as there are in the backdrop picture.
To display a picture, drag the sprite file icon onto the background. Click Menu over it and choose Make backdrop.
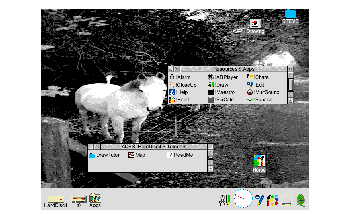
This scales the sprite to fit the whole screen, and may result in a distorted backdrop (as the proportions of the original picture are not maintained).
 Make backdrop also has a submenu for finer control of backdrop pictures:
- Scaled has the same effect as Make backdrop: the sprite is scaled to fill the whole screen.
- Centred has the effect of centring a sprite on the background. The desktop maintains the correct proportions of the sprite (this may leave grey space around the edges of your backdrop picture).
- Tiled makes multiple copies of the sprite and tiles them so that the backdrop fills your screen.
Note: Each time you use the Display manager to change the resolution or colours used by the desktop, the original sprite is read again. This may take some time if the sprite is stored on floppy disc, so it's best to store it on your hard disc.
If you're creating a sprite to use as a tiled backdrop, make sure the sprite does not have a palette (using the Paint/Edit/Palette menu option - see Paint ).
Removing a backdrop
You can remove a backdrop picture by choosing Remove backdrop. This does not delete any files, or remove any icons from the backdrop.
Textured desktop backdrops
The computer contains a number of textured desktop backdrops. You can change these using the Screen configuration window of !Boot; see page 40 for more information. The following picture shows a marbled backdrop being used with marbled window backgrounds.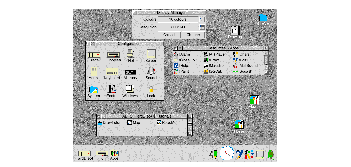
Note: If you save a Desktop boot file that loads one of your own sprites as a backdrop automatically, you must set the Background texture to None in the Screen configuration window of !Boot (see page 40 and page 56).
Iconised application menu options
Hold down Shift and press Menu over an iconised application window to display the application menu for that window (instead of the usual Pinboard menu):
This can be useful if you want to save a file without actually opening its window.
Advanced Filer operations
This section describes some of the more advanced Filer operations.
Setting file access permissions
A file's access permission settings define who is permitted to read it, write to it or delete it.
 Using the File/Access submenu
To:
- Allow a file to be read and altered only by you: Choose Access/Private and Access/Unprotected. This is the default setting.
- Allow a file to be read but not altered by anyone on a network (including you): Choose Access/ Public and Access/ Protected. This is a good way of protecting finished files. The Force option (see page 28) overrides this.
If you change the access to a directory, all the files in the directory are affected.
Using the File/Access/Access details submenu
 Most of the time you'll use the simple method above to set access permissions. However, you can also set access using the Access/Access details dialogue box:
- Locked - the file cannot be deleted (off by default). You can override this with Force (see page 28).
- Owner read - the file's owner can read it (on by default).
- Owner write - the file's owner can write to it (on by default).
- Public read - other network users can load your files or run an application in your network space (off by default).
- Public write - other network users can write to the file (off by default).
To apply access permissions recursively to the contents of a directory, switch the Recurse option on (this only works with applications and directories).
If you use a Level 4 Fileserver, take care when you set directories on it to Locked: this may make these directories invisible to other users on the network.
How to identify file access permissions
There are several ways to find out the access permissions for a file.
- You can display the Access/Access details dialogue box.
- You can display the files using the Display/Full info menu option.

- You can use the File/Info option; see Information and help on page 13.
Finding files
If you've saved a file somewhere in your directory structure, but can't remember where, Find will help you locate it:
- 1 Select the directory or directories you want to search.
- 2 Press Menu and type the name of the file you want to find into the Dir./Find/Find file: writable icon.
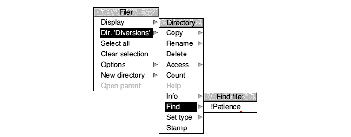
- 3 Click on the name, or press Return.
If the object is found, you'll see one of two dialogue boxes:
If the object found is a file, you can
- Abort the search
- Run the file (if the file is a program, it will be run; if it is a file, it will be loaded into the appropriate application, if one can be found)
- View the directory containing the file
- Continue to search for another object with the same name.
If the object found is a directory, you can
- Abort the search
- Open the directory
- Continue to search for another object with the same name.
Using wildcard characters
You can use Wildcards to represent unknown characters in the search string:
* represents zero or more characters of any sort. # represents one character of any sort.
For example:
aeo* would match aeo, aeon and aeons, and any name that begins aeo.
aeo# would match aeon, and any four letter name that begins aeo.
aeo## would match aeons, and any five letter name that begins aeo.
All Find parameters are case-insensitive; AEO# is the same as aeo# or Aeo# etc.
Setting a file's type
Every file has a file type, which determines what happens when you double-click on a file icon. For example, files of the type Text are loaded into Edit, files of the type Obey are interpreted as lists of commands to be carried out, etc.
To change a file's type:
- 1 Select the file whose type you want to change.
- 2 Press Menu and go to the Filer/File/Set type writable icon.
- 3 Enter the file type, in normal text or as a hexadecimal number.
For a list of file types, see RISC OS file types on page 445.
Date/time stamping
 Files are marked with the date when they were last altered, and directories when they were first created. Applications show the date of the !RunImage file (or, if one is not present, of the directory). This information is shown when you display Full info, or when you select a specific file or directory and choose File/Info (see page 13). The time and date used is that provided by the computer's real-time clock, which you can set using the Alarm application.
Stamp enables you to update the date and time stamping on files and directories to the current date and time. To do this:
- 1 Select the object(s) you wish to stamp.
- 2 Choose Filer/File/Stamp. The date stamp will be updated. You can check this using the Info menu option.
Modifying Filer operations
 Four settings in the Filer/Options submenu provide finer control over most of the filing system operations invoked from the Filer menu. These options apply to all subsequent filer operations, as well as the current one.
Confirm
This prompts you before performing an action. This helps safeguard against the accidental deletion of files, for example. It is off by default.
When this option is switched on, you can
- choose Abort to abandon an entire operation
- choose No to skip the present object and go to the next
- choose Yes to carry out the operation on the present object and go to the next.
- choose Quiet to continue with the operation without asking for further confirmation (in cases where the operation affects more than one object).

Verbose
This tells you about the progress of an operation. It is switched on by default.
Information about the current operation is displayed in a dialogue box. You can
- choose Abort to abandon the entire operation
- choose Pause to interrupt it temporarily. The button will change to Continue (click on Continue to proceed with the operation, or on Abort to stop).
Verbose gives you useful information, so it's worthwhile leaving it switched on.
Force
This enables you to delete files and directories even if they are locked (unless they are stored on a network server with different ownership). It is off by default.
This is particularly useful if you want to delete a directory containing a lot of files, some of which may be locked. However, use this option with great care, as it overrides all file protection (see Setting file access permissions on page 24).
Newer
This applies only to copying, and is designed to ensure that you don't overwrite a file by an older version of the same file. It is off by default.
If you set out to copy a file to a directory where there is already a file of that name, the file will only be copied if it is newer than the file in the destination directory.
Note: This slows down copying operations over networks, since it must check the destination for a newer file of the same name.
Faster
If Verbose is switched on, you can click Menu on any of the standard Filer dialogue boxes, such as those you get with copying, finding, deleting and moving. You will then be able to choose the Faster option.
This option makes file operations faster, at the expense of the appearance of the desktop. Normally during file operations, keeping the look of the desktop up-to-date takes priority over speed. If you choose the Faster option, speed takes priority: files and windows aren't updated until the current operation has finished.
Correcting problems
If a problem arises during a Filer operation, you'll see an error box displayed: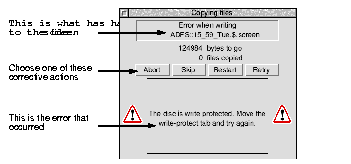
- Abort lets you cancel the file operation completely.
- Skip skips the current file operation and starts afresh on the next file.
- Restart starts the operation on the current file from the beginning.
- Retry tries to start the operation again from where the error occurred.
Once you've cleared a problem, you'll find that clicking on Retry normally allows you to continue with the operation.
Pathnames
The full pathname of a file or directory appears in the title bar at the top of the file window or directory display:
The pathname is the complete 'address' of a file or directory. Usually just the filename is sufficient, but sometimes you need to specify the whole pathname.
Technically, a pathname has the following general form:
filing-system::disc-name.[directory-names.]filename
So, in the above example:
Pathname text: Points to
adfs: : the filing system name (note the trailing colon). If you omit the filing system name, the current filing system is used (see below). On a network, the filing system name is followed by the network name.
:HardDisc4 : the name of the hard disc, floppy disc or other storage device (note the preceding colon).
.$ : the ' root' directory, usually the directory you first open when you click on a storage device icon. On network file servers, this will be replaced by &, your 'user root directory' (which may be one or more directories away from the root). If you omit this, and the filing system name and disc name, the path is taken relative to the current directory.
.Images .00-49: directories nested within the root directory (note the preceding full stops).
.key00-24: a file or directory within the 00-49 directory.
Note: If the pathname of a directory exceeds around 250 characters in total, you may not be able to open it. If this is the case, move the directory higher up the overall directory structure (it's unusual to have such a deeply-nested structure, and you should avoid it if possible).
Current filing system
The default current filing system is that used by your hard disc drive (if fitted), usually ADFS. The current disc is also usually your hard disc drive.
RISC OS 3.7 User Guide - 21 JAN 1997


Click on it.
Click Select or Adjust on the first icon, and Adjust on each of the others in turn. You can also drag a box round a group of icons. Use Adjust to deselect unwanted icons or to select additional icons.
Press Menu, choose Filer/Select all. There's more on the Filer menu on page 10.
Click Adjust on it. Useful for selecting many icons in a display: choose Select all then click Adjust on unwanted icons.
Press Menu, choose Filer/ Clear selection. You can also click over a blank part of the directory display.
To copy to a different directory, drag the Copy as icon to the destination directory display.
Filenames can be one to ten characters long. They mustn't contain spaces or any of these characters:
There are 1024 bytes in a kilobyte and 1024 kilobytes in a megabyte. A 1.6MB format disc doesn't hold 1.6 x 1024 kilobytes: it actually holds 1600 kilobytes.
This displays the file type, size, access details and date last modified - information similar to that shown when you choose Display/Full Info (see page 7).
Click on the Colours menu icon, choose a number from the list and click on Change.
To see any difference for more than 16 colours, you'll need to run an application or display a picture that takes advantage of the higher number of colours available.
Click on the Resolution menu icon, choose the resolution you want and click on Change.
The resolutions you can select depend on the type of monitor you are using. The monitor type is defined in the Screen configuration menu (see page 40).
Drag the icon from a directory display and drop it on the background (not the icon bar). You can pin icons for files, directories and applications. Drag icons to reposition them.
Double-click on the pinned directory icon. The pinned icon will stay on the pinboard.
Double-click on the pinned application icon.
Double-click on the pinned file icon. This also starts the application, if it's been seen by the filer.
Click each icon with Adjust, or drag a selection box around them all. You can also use Pinboard/Select all. See page 21.
Hold down Shift and click on the Close icon. This saves cluttering the desktop with open windows. When you reopen an iconised window, the icon disappears from the Pinboard.
Double-clicking on this file restores Pinboard to its saved state. You can't save information about iconised application windows.
Make backdrop also has a submenu for finer control of backdrop pictures: