


RISC OS 3.7 User Guide
2 Changing the computer's configuration 
This chapter tells you all about changing your computer's default configuration ( hardware configuration, memory allocation and password protection).
Introduction
There are two ways of customising your computer to suit your own way of working:
 This chapter explains the first method; it tells you how to use the Configuration window (part of !Boot) to change your computer's default configuration.
On hard disc machines, the !Boot application is always stored in the root directory. Click on the hard disc icon and you will see it (on network systems, it is known as !ArmBoot or !ShareBoot).
Never move or delete !Boot; your computer may not work if you do!
One term you'll come across many times in this chapter is CMOS RAM. This is part of the computer's memory where any configuration changes are stored. Using !Configure changes the default CMOS RAM settings. You can override some CMOS RAM settings with a Desktop boot file or the Task manager (described later on).
Planning ahead
Before you change your computer's configuration in any way, it's a very good idea to save all the default settings. Similarly, when you've got the computer set up exactly as you want it, save the settings. That way, if you ever change something you don't mean to, you'll always be able to get back to a known state!
Here are the files you'll need to save:
- A Configure file (see page 33)
- A Desktop boot file (see page 53)
- A backup copy of the !Boot application (see page 56).
Changing configuration settings with !Boot
 Your computer will function well with the default settings that were set up when it was manufactured. However you can change many of these settings to suit your own way of working, by using the Configuration window of ! Boot.
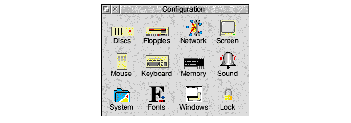
Changes to the configuration mostly take effect as soon as you make them, and are maintained even when you switch the computer off.
To:
- Display !Boot's Configuration window:
 Double-click on the !Boot icon in your root directory. Called !ArmBoot or !ShareBoot on a network.
- Open one of the Configure dialogue boxes:
 Click on the relevant icon in the main Configuration window (e.g. Sound)
- Ensure configuration changes take effect: Most have an immediate effect. For those that don't, either click on Set, or shut down and restart the computer (see page 67). See the sections on individual Configure dialogue boxes, starting on page 34.
- Close a Configure dialogue box:
 Click on its Close icon or Cancel button. Your changes may not take effect (see Conventions on page 33).
- Save a Configure file:
 Press Menu over the Configuration window and drag the Configure icon in the Save/Save as dialogue box to a directory display.
 This saves all the changes you make in the Configuration window. You can save many configuration files.[1]
Keep your Configure files on a floppy disc.
You can also use the SaveCMOS application in the Diversions.Tools directory.
- Restore saved configuration settings :
 Double-click on a Configure file you've saved to disc. Loss of configuration is caused by failure of the computer's internal battery, or certain power-on reset combinations (see page 71).
- Close the main Configuration window:
 Click on its Close icon or press Menu over the Configuration window and choose Quit.
Conventions
The Configure dialogue boxes use some special conventions:
 Clicking Select (or Menu) on a menu icon displays a menu.
- When you type a number or word into a box, make sure you always press Return otherwise your changes will not be remembered by the computer.
The Configure dialogue boxes are described in detail in the following sections.
Discs
 Only use this dialogue box when you change the number of hard discs or CD-ROM drives you have in your computer.
Warning: If you set an incorrect number of discs, your computer may fail to start up correctly.
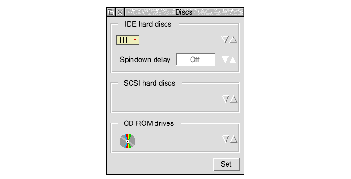
In this case, see Troubleshooting on page 71).
Usually your computer will only support one type of hard disc: IDE. However, you can buy SCSI expansion cards which allow you to connect up to four SCSI hard discs, as well as SCSI CD-ROM drives (your supplier will tell you how many CD-ROM drives you can connect). Only use the dialogue box shown above to set the number of SCSI discs if you are using an Acorn SCSI card: other manufacturers use CMOS RAM in different ways. SCSI discs over 512MB in capacity are not supported.
To:
- Define the number of hard discs and CD-ROM drives fitted in your computer: Click on the arrows to reflect the number of IDE discs, CD-ROMs or SCSI hard drives fitted[2], then click on Set. Some CD-ROM drives use the IDE interface; you can only attach two IDE devices to your computer.
- Stop the IDE disc spinning after a defined period of inactivity: If applicable, click on the arrows to set the Spindown delay, then click on Set. Some IDE discs support this. For most drives, it's not activated and cannot be used.
Floppies
 Only use this dialogue box when you add or remove floppy disc drives.
To:
Network
 You will only use this option if your computer is connected to a network. See the chapter Networking on page 99 for more information about the different types of network to which your Acorn computer can be connected.
Click on the Network icon and the network configuration window will be displayed:

You can configure three types of network connection:
- AUN (Acorn Level 4 Fileserver Econet software running over Internet)
- Access
- Internet (full TCP/IP).
Configuring connection to an AUN network
If you are going to use Level 4 Fileserver Econet protocols, choose AUN; the AUN dialogue box will be displayed: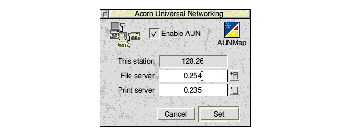
- 1 Tick Enable AUN. This is not necessary if you are using 'native' Econet.
- 2 If you will be using AUN and Internet together, double-click the AUNMap icon (or drag an existing AUNMap file onto the dialogue box) and enter any mappings between IP addresses and Econet addresses. For details, see the AUN Manager's Guide, or comments inside the AUNMap file itself.
- 3 Enter names for your default File server and Print server.
Note: If your network is already up and running, you will be able to choose from the appropriate menu icons instead of typing in names manually.
- 4 Click on Set to leave the dialogue box.
Configuring connection to an Access network
If you are connected to a disc-sharing Access network, choose Access from the Network configuration dialogue box; the Access dialogue box will be displayed:
- 1 Tick Enable Access.
- 2 Click on Set to leave the dialogue box.
Configuring your Internet (TCP/IP) connection
These instructions apply only if you are on a full TCP/IP network.
- 1 Click on the Internet icon and the Internet configuration dialogue box will be displayed:

- 2 Click on Enable TCP/IP Protocol Suite.
Setting the Host name
- 1 Click on Host names to display the eponymous dialogue box:
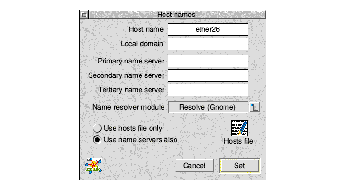
- 2 Type in your host name.
- 3 If you are using a name resolver, click on Use name servers also.
Note: No name resolvers are supplied with RISC OS, but the most common current name servers, of which InetSetup is aware, are:
- ANT's Resolver module
- Gnome's Resolve module
- InetDB
- ResolverZM.
InetSetup will look for these in your System directory as System:Modules.Network.<resolver_name>
- 4 An empty Hosts files is supplied. To specify the hosts on your network, you can either drag an existing Hosts file onto the Hosts file icon in the dialogue box, or double-click the Hosts file icon to edit the default version.
- 5 Click Set to confirm your changes (if any) and leave the dialogue box.
Setting the routing options
- 1 Click on the Routing icon in the Internet configuration window to display the routing options:

- 2 If you have a connection to an external network, enter the name of your gateway machine - otherwise leave this field blank.
- 3 If necessary, set the other options in the dialogue box:
- Act as an IP router - this lets your machine act as a gateway if you've got more than one network interface.
- Run RouteD - this is normally greyed out, unless you have the full Acorn TCP/IP Protocol Suite (in which case, please refer to the documentation for that product). Pressing Menu will allow you to choose your RouteD options.
- Routes file - this lets you specify more advanced routing information - either click on the icon to edit the default file, or drag a custom Routes file onto the icon.
- 4 Click Set to leave the Routing dialogue box.
Setting the network interface
- 1 Click on the Interfaces icon in the Internet configuration window to display the network interface configuration options:

If you only have one interface card, it will be enabled automatically.
- 2 Click on Configure... to display the interface configuration options for a specific card:
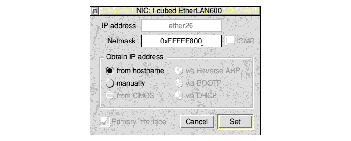
- 3 Click on Set to confirm your settings and quit the dialogue box.
- 4 Click on Close to leave the Interfaces dialogue box.
Saving your Network Configuration
You should now have returned to the Network Configuration dialogue box:
To save your configuration:
- 1 Click on Save: this writes files to your !Boot application, and changes certain CMOS settings, loading and unplugging modules as required.
- 2 Click on Reset now to restart your computer using the new configuration.
Screen

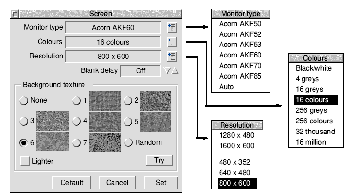
Use this dialogue box to set up the Screen configuration parameters.
When you have finished setting up the parameters click on the Set button. If you have made changes in the window but don't want to save them, click on Cancel. If you want to bring the screen back to a known state click on the Default option.
To:
- Define the type of monitor you're using: Choose from the Monitor type menu.

If you can't get a picture, see page 71.
If your monitor isn' t listed, try the Auto option.
If you change the amount of VRAM in your computer, reselect the monitor type.
- Configure the default number of colours used on start-up: Choose from the Colours menu.
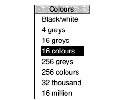 16- or 256-colour modes are best as defaults. If you find you always work with more colours you can change this.
- Configure the default resolution used on start-up: Choose from the Resolution menu.
 Use a square pixel mode (640x480, 800x600 or 1024x768) to keep object proportions constant.
- Blank the screen after an idle period: Set the Blank delay using the arrows. Move the mouse to restore the display[3].
- Change the background texture: Try out backgrounds (normal or Lighter) first by clicking on Try. You can also have a Random texture, or None at all, or use a sprite as a backdrop (see page 22[4]).
Mouse

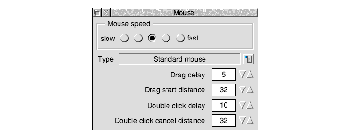
Use this dialogue box to set up the mouse configuration options.
To:
- Set the mouse/pointer sensitivity: Click on one of the Mouse speed buttons. The faster the speed, the quicker the pointer moves around on the screen.
- Define the type of mouse you're using: Choose from the Type menu icon to reflect the type of mouse fitted. The first item in the menu is the default mouse type for your machine. Your computer will not work properly if you select the wrong type[5].
- Change the timings for a mouse 'drag': Set the Drag delay and Drag start distance using the arrows. Delay default[6]: 5 tenths of a second. Start distance default: 32 OS units.
- Change the timings for a 'double-click': Set the Double click delay and Double click cancel distance using the arrows. Delay default: 10 tenths of a second. Cancel default: 32 OS units.
Keyboard
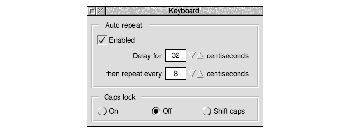
 Use this dialogue box to set the keyboard Auto repeat and Caps lock options.
To:
- Control how quickly characters repeat when you hold down a key on the keyboard: Tick Enabled, set the Delay for and then repeat every intervals. Delay default: 32 centiseconds. Repeat default: 8 centiseconds[7].
- Configure the state of the Caps Lock key on start-up: Choose On (all caps), or Off (all lower case), or Shift caps (Caps Lock on, Shift gives lower-case). In normal use Caps lock should be Off. Shift caps is like the reverse of Caps Lock.
Memory
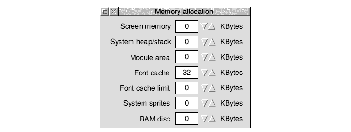
 Use this dialogue box to configure memory allocation on start-up.
Notes:
- You must reboot the computer before these changes take effect.
- You're most likely to want to change the Font cache and RAM disc settings.
- A Desktop boot file (see page 51) overrides Font cache, System sprites and RAM disc settings here. The only way to make these settings to take effect is to save a new Desktop boot file or edit the existing one (see page 53).
Settings:
- Screen memory: Memory for use by the screen. Best left at zero (default).
- System heap/stack: Extra memory for the System heap. Best left at zero (default).
- Module area: Extra memory for modules loaded from disc. Leave at zero, unless an application has many RAM modules.
- Font cache: Memory for fonts. If you're using many fonts, increasing this speeds up screen redraws. Must be at least 32K. See Using fonts in applications on page 185.
- Font cache limit: Maximum size to which Font cache can grow. See Using fonts in applications on page 185.
- System sprites: Memory for system sprites. Best left at zero (default).
- RAM disc: Creates a RAM disc (see page 96 for more information). It's far better to create a RAM disc using the Task manager (see page 64) each time you need it.
Sound
 Use this dialogue box to set the Sound configuration.
To:
- Set the volume of the computer's speaker: Use the arrows to set the volume level. This controls the overall level of sound output from any sound-generating activity (except a CD-ROM - see page 337).
- Change the system beep sound: Click on the menu icon to display a list of installed voices and choose a voice.
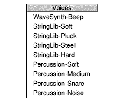 This sets the voice used by the first of the computer's eight sound channels.
You can also cycle through the voices using the up/down arrows, or enter a voice number in the writable icon.
- Change the system beep level: Choose Quiet or Loud. The value of Quiet and Loud is determined by the sound Volume.
- Set the computer's sound quality to 16-bit: Switch the 16-bit sound option on. Not all computers can use 16-bit sound. See your Welcome Guide.
System
 Use this dialogue box to update your computer system with replacement parts of the operating system or additional extensions required by applications. These parts are called modules and are supplied in an application called !System.
To:
- Merge a new !System with the existing !System in your computer: Drag the new !System icon over the !System icon in this screen. Updating the !System may take a little while, as the modules are read from the disc and then stored in the computer.

Note: Access permissions may be changed during a merge, and some locked files may be overwritten.
Fonts
 Use this dialogue box to change the font configuration.
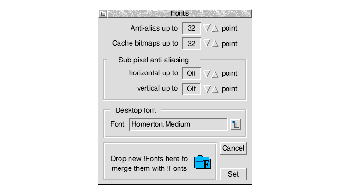
Click on Set to redraw the screen using the values you specify in this window.
To:
- Place an upper limit on the size of anti-aliased fonts: Use the arrows to set the Anti-alias up to limit. Never set to less than 12pt (the desktop font size).
Larger fonts are usually printed with no anti-aliasing.
- Specify the largest bitmap font size to be cached: Use the arrows to set the Cache bitmaps up to limit. Set to the size of text you usually use in documents (e.g. 12pt).
- Have more control over anti-aliasing: Use the arrows to set the Sub-pixel anti-aliasing limits. If you use this option, you will need to increase your font cache (see page 43 and page 189). You should normally leave this Off.
- Set the default desktop font: Click on the Font menu icon and choose from the Fontlist.
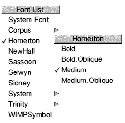 Text in menus and directories is displayed at 12pt. The standard desktop font is Homerton.Medium. Note: We recommend that you only choose between Homerton.Medium, Trinity.Medium and System font as the standard desktop font, especially if you have no hard disc. These fonts are stored in the computer's ROM, which makes it very quick to redraw the desktop.
- Merge a new !Fonts with the existing !Fonts in your computer: Drag the new !Fonts icon over the !Fonts icon in this screen. Never use a !Fonts designed for use with earlier versions of RISC OS. Transfer any fonts you want into a current version of !Fonts before merging.
If you want to know more about these options, see Using fonts in applications on page 185.
Windows
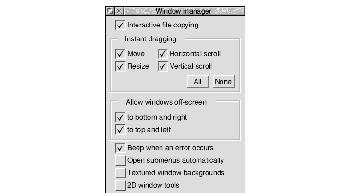
 Use this dialogue box to configure the way the desktop windows behave.
To:
- Enable multi-tasking Filer operations: Switch Interactive file copying on. When disabled, copying is quicker, but you can't use the desktop while copying.
- Update the screen as you drag, resize or scroll a window: Switch on any or all of the Instant dragging options. : When disabled, only a dotted outline moves until you have finished the drag.
- Allow windows to be dragged off-screen: Choose to bottom and right and/or to top and left. You can't 'lose' a window, since part of the Title bar is always visible on screen[8].
- Cause a beep to sound when an error box is displayed: Choose Beep when an error occurs. This uses the default system beep sound (see page 45).
- Display submenus automatically: Choose Open submenus automatically. If you point at a menu option that has an arrow next to it, the submenu will open automatically after a short time.
- Display windows with a marble texture: Choose Textured window backgrounds.
- Use 2D window icons: Choose 2D window tools.
Lock
 Use this dialogue box to set a password to protect your hard disc and computer configuration against unwanted changes.
The computer can be in one of three states:
- No password set - computer unlocked (the computer is supplied this way)
- Password set - computer unlocked
- Password set - computer locked
When unlocked, you can change files on the hard disc and modify the computer's CMOS RAM configuration settings using !Boot.
When locked, only the Public directory in the root directory of the hard disc is writable, but all of the hard disc is readable. However, the Public directory must exist before you lock the computer, or you won't be able to create it! You can not modify the computer's configuration when it is locked.
Note: Unlocking the computer does not override any individual file access permissions already in force (see page 24).
To:
- Set a password and lock the computer: Type the password in the two New password boxes (use the arrow keys to move between them) then click on Lock. Passwords must be at least five characters long. The Configuration window changes so you can only use the Lock window.
- Change an existing password: Type in the Old password. Type the New password twice, then click on Change password.
- Temporarily remove password-protection: Type the password in the Old password box and click on Unlock. Next time you switch on, the computer reverts to being locked.
- Lock the computer: Click on Lock. This assumes you've previously set a password.
- Unlock the computer permanently: Type in the Old password and click on Change password. In effect, you're supplying a blank new password.
- Restart the computer if you've forgotten the password: Reset the computer's CMOS RAM configuration to the default settings - see page 71. This may fail if your computer is fitted with an internal configuration protection connector (see the Welcome Guide).
Using applications with a locked computer
Some applications automatically write information to the hard disc during use. If your computer is locked, this cannot occur. For example:
- !Alarm usually saves its alarm files onto the disc. You can't do this with a locked disc so you'll see an error message. However, you can explicitly save your alarm file to the Public directory (see Save as alarms on page 326).
- You can't modify !Printers while the disc is locked.
- You can't change applications that save configuration details using a Save choices option (such as !ARPlayer).
- You can't save a new Desktop boot file (see Desktop boot files on page 51).
[1] A Configure file is particularly useful if you're running an application that uses a lot of memory. The application's documentation might tell you to release as much memory as possible, but this will produce a configuration that, while it is useful for that particular application, may not suit your usual requirements.
[2] Do not select a larger number of discs than are in your computer.
[3] Audio may cause interference on a blanked screen. This is nothing to worry about.
[4] If you save a Desktop boot file which does this automatically, you must set the Background texture to None.
[5] If you do set the wrong mouse type by mistake, you'll need to reset it from the command line. See page 423.
[6] Values that differ greatly from these may give rise to strange effects with some applications.
[7] Values that differ greatly from these may give rise to strange effects with some applications.
[8] It can be difficult to see a window right at the bottom of the screen. Changing to a larger screen mode will 'find' any lost windows.
RISC OS 3.7 User Guide - 21 JAN 1997


Double-click on the !Boot icon in your root directory. Called !ArmBoot or !ShareBoot on a network.
Click on the relevant icon in the main Configuration window (e.g. Sound)
Click on its Close icon or Cancel button. Your changes may not take effect (see Conventions on page 33).
Press Menu over the Configuration window and drag the Configure icon in the Save/Save as dialogue box to a directory display.
This saves all the changes you make in the Configuration window. You can save many configuration files.[1]
Double-click on a Configure file you've saved to disc. Loss of configuration is caused by failure of the computer's internal battery, or certain power-on reset combinations (see page 71).
Click on its Close icon or press Menu over the Configuration window and choose Quit.
16- or 256-colour modes are best as defaults. If you find you always work with more colours you can change this.
Use a square pixel mode (640x480, 800x600 or 1024x768) to keep object proportions constant.
This sets the voice used by the first of the computer's eight sound channels.
Text in menus and directories is displayed at 12pt. The standard desktop font is Homerton.Medium. Note: We recommend that you only choose between Homerton.Medium, Trinity.Medium and System font as the standard desktop font, especially if you have no hard disc. These fonts are stored in the computer's ROM, which makes it very quick to redraw the desktop.